 Tools
Tools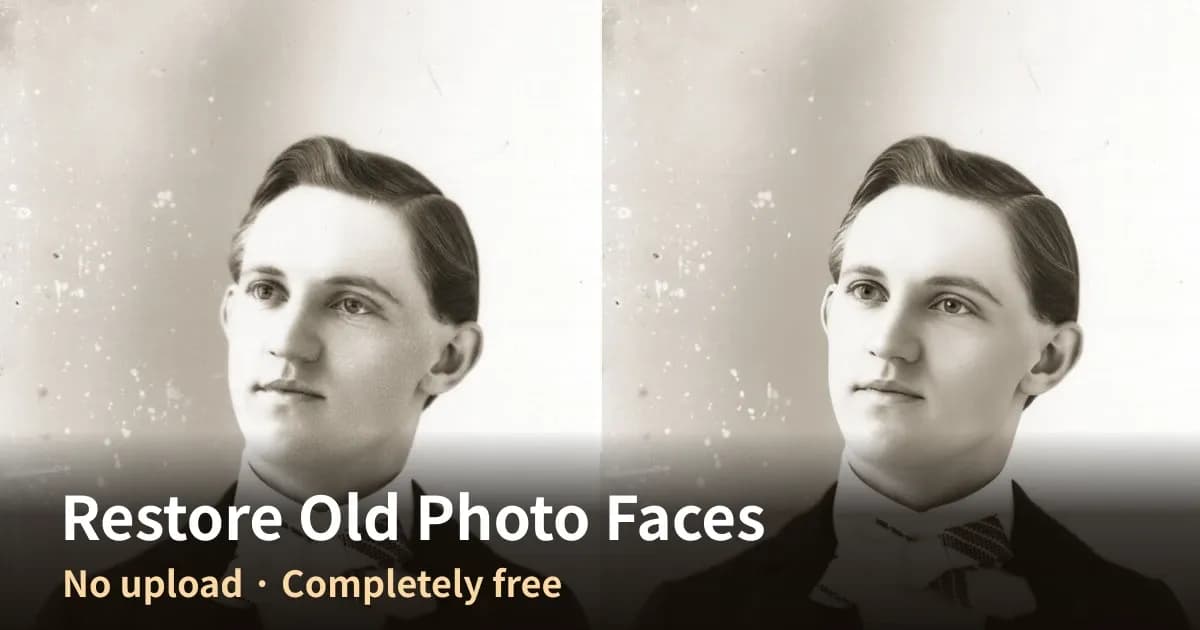
You scan an old photo from an album and find that the face has collapsed into grain, so it is hard to tell who it is. Film grain and scanner noise fill in the fine detail of a face, so the more you enlarge it the more the eyes and mouth blur out, and it is worse when the print itself was small or the picture came from an old mobile phone, to the point where it cannot be used for printing at all.
There are services that will restore a photo for you, but they charge for it and they mean handing a family photo to a company you do not know, and the free web tools are the same because nearly all of them require an upload.
This article explains how to have an AI redraw the faces in a photo using the face restoration tool in "Media Tools", which I built. Everything runs inside the browser, so the photo is never sent anywhere, there is no account to create, no fee, and no limit on how many images you process.
What You'll Learn from This Article
- What face restoration can and cannot do
- How to restore the faces in a photo with AI
- How to keep the likeness in a restored face
- How to restore all the faces in a group photo at once
- Possible reasons a face is not restored
All you need is the photo and a browser. There is no app to install, no account and no fee, and the photo is never uploaded.
What it can and cannot do
To set the scope first: this tool only redraws the area it detects as a face, and the background and clothing are left exactly as they were.
What you want | Possible? |
|---|---|
Sharpen a blurred or noisy face | Yes |
Fill in detail on a low-resolution face | Yes |
Process several faces in a group photo at once | Yes |
Raise the quality of the whole photo, background included | Yes, with "Upscale first" |
Repair tears, creases or missing areas | No |
Reproduce exactly the same face as the original person | No |
The last row is the one that is misunderstood most often, because "GFPGAN", the model this tool uses, generates a plausible face rather than recovering information that was lost. The lower the quality of the original, the more the result leans on estimation, so the finished face can give a slightly different impression from the person, and for photos where you want to keep the person's likeness, such as family photos, you need to lower the "Restoration strength" described below to blend the original face back in.
What to prepare
- The photo you want to restore (JPG, PNG, WebP and HEIC can be loaded as they are)
- A browser (Chrome, Edge, Safari or Firefox)
- About 165 MB of traffic on the first run, to fetch the AI model
There is no Python environment to set up and no need for a PC with a GPU. Where WebGPU is available it runs on the GPU, and where it is not it falls back to the CPU. On my machine the difference per image was 1.0 second on the GPU against 11.85 seconds on the CPU.
How to restore a face
There are three steps: open the page, load the photo, and press "Run".

Free tool that restores faces in low-quality or blurry photos with AI (GFPGAN), redrawing eyes, skin and outlines. Inference runs in your browser, so photos are never uploaded.
 media.tools.ryusei.io
- Open the face restoration page in your browser.
- Drop in the photo you want to restore, or click to select it. Several images can be loaded at once.
- Press "Run" and the processing starts; when it finishes, "Restored N face(s)" is shown.

The first run has to fetch the AI model, so it takes longer, and on my machine (Radeon 780M / WebGPU) it took 36 to 113 seconds including that download. The spread comes from the connection and how busy the server is, but from the second run onward the model is kept in the browser, so the same photo finishes in 1.0 second.
Once it is done, "Compare" puts the result side by side with the original. The image below is a portrait taken around 1900: the original is on the left and the restored version on the right.

The eyes and eyebrows have a clear outline again and the tonal range in the skin, which the film grain had filled in, has come back. The flow of the hair, on the other hand, is tidier than in the original, and that part was generated.
Keep the likeness with "Restoration strength"
The default of 1 uses the restored face as it is, and lowering it blends the original face back in, which holds down how much the generation changes.
Setting | When it fits |
|---|---|
1 (default) | When it is enough to tell who is in the photo |
0.5 to 0.7 | When you want to keep the person's likeness |
0.3 to 0.4 | When you only want the noise gone |
For photos where "is this really them" carries meaning, such as family photos, I start at 0.5 and raise it if that is not enough. Processing at 1 from the start does produce a clean image, but it can end up giving the impression of a different person.
Enlarging first
Setting "Upscale first" to 2× or 4× enlarges the whole photo with the AI upscaler before restoring the faces, which suits printing a small photo. Everything outside the face is enlarged too.
If a sharper face is all you are after, leave it on "No upscaling". The extra step makes processing longer, and the original size is often enough.
Group photos are handled in one pass
Faces are detected automatically, so there is no count to specify no matter how many people are in the frame. On a group photo from 1894 (1280×1357) it restored 26 faces in 14.5 seconds, which works out at 0.56 seconds per person.

The top is the original group photo, and below it are three people cropped out and enlarged. Every one of them has clearer eyes and mouth, while the trim on the hats and the fur collars stayed as they were.
To raise the quality of the whole photo, set "Upscale first" to 2× or 4×, or enlarge the photo with "AI Upscale" before running face restoration. Faces enlarged with "Real-ESRGAN" tend to come out flat in the fine detail, and GFPGAN only touches faces, so running both in order leaves everything outside the faces enlarged by Real-ESRGAN and the faces redrawn by GFPGAN.
If nothing is restored, no face was detected
Sometimes it looks as though running the tool changed nothing, and in that case no face was detected. The screen shows "No face was found, so the image was written unchanged" and the original image is written out as it is.

There is essentially one cause: the face is too small. Detection shrinks the long side of the photo to 640 pixels first and then discards any face under 24 pixels, so a face that appears small in a large photo is the one that drops out. When I shrank that group photo down to 400 pixels the faces came to about 19 pixels and not a single one was detected.
The fix is to crop around the face and run it again. From that same 400 pixel image I cut out just the part with people in it, enlarged it to 800 pixels, and 5 faces were detected and restored in 2.9 seconds. Media Tools also has a cropping tool, so the whole thing stays inside the same browser.
Original photo | Faces detected | Time |
|---|---|---|
Group photo at 1280px | 26 | 14.5 s |
The same at 640px | 24 | 12.9 s |
The same at 400px | 0 | 0.12 s |
Cropped from the 400px version and enlarged to 800px | 5 | 2.9 s |
How blurred the photo is barely affects whether detection succeeds. A heavily blurred version still had its face detected and restored in 1.05 seconds, and a face turned to the side was detected without trouble as well.
The photo is never sent anywhere
The processing goes like this.
- "RetinaFace" locates each face along with five points on the eyes, nose and mouth
- The face is cut out so that those five points line up with a 512×512 reference position
- "GFPGAN v1.4" redraws the 512×512 face
- It is warped back into place and the seam is feathered with a mask
This is the same sequence the official GFPGAN tool uses, and I ported it so that it runs in a browser. The AI model runs on onnxruntime-web, using WebGPU where it exists and WebAssembly where it does not. Throughout all of this, the photo never goes out onto the network. The only thing fetched from the network is the AI model file.
The part of the port that gave me the most trouble was converting the model. Trying to shave something off the 165 MB, I used onnxconverter-common to convert the whole model (the computation graph) to 16-bit numbers (fp16), and although it worked correctly on the CPU, WebGPU returned broken output. I settled on converting only the learned values (the weights) to 16-bit and leaving the computation in 32-bit (fp32). It is the kind of fault you cannot notice by verifying on the CPU in Python, so I now print statistics for the inputs and outputs on the browser side to check.
Frequently asked questions
Is it free?
Yes. There is no account and no login, and no limit on how many images you can process.
Is my photo sent to a server?
No. The AI runs inside the browser, so the photo you load never leaves your device, and the only thing fetched on the first run is the AI model file. Apart from downloading the model, Media Tools sends processing statistics (such as the tool and settings used and device specs) to the site's server, but these do not include the photo itself, file names or IP addresses. You can turn this off with the "Send processing statistics" switch near the bottom of the page.
Can I use it on a phone?
Yes. The first run does involve about 165 MB of traffic, though, so it is safer to try it on Wi-Fi.
Do I need a GPU?
No. Where WebGPU is unavailable it runs on the CPU (WebAssembly), and on the same photo that meant 11.85 seconds against 1.0 second on the GPU, but the processing itself is identical and so is the result. Which one was used is shown when it finishes.
Why does the face not look like the person?
GFPGAN generates a plausible face rather than recovering information that was lost. Lowering "Restoration strength" to 0.5 to 0.7 keeps more of the original features, though the lower the quality of the original, the more the result leans on estimation, so there is a limit to what lowering it can do.
Can it repair a torn photo or a missing area?
No. This tool only works on the detail of a face, so it is not suited to filling in damage.
Summary
Restoring the faces in an old photo takes no app and no account. Load the photo, press "Run", and only the faces are redrawn.
- Faces are detected automatically. On the 1894 group photo I tried, 26 faces were processed in 14.5 seconds
- On my machine a photo with one face took 1.0 second, with only the first run, including the model download, taking 36 to 113 seconds
- When nothing changes, the face is too small. Crop around it and run again
- You do not get the exact same face back. Lower "Restoration strength" to keep the likeness
- The photo never leaves the browser, which makes family photos easier to handle
Related articles and tools

Free tool that enlarges small images and old photos 2× or 4× with AI (Real-ESRGAN). Inference runs in your browser, so images are never uploaded. WebGPU supported, no sign-up.
 media.tools.ryusei.io
Removing the background from an image does not require uploading it anywhere. Here is how to cut out people and products with AI running inside your browser, which of the two models to use, and the processing times I measured.

Convert, compress and edit images, audio and video entirely in your browser, with AI upscaling and background removal. Free, no upload, no size limit, no sign-up.
 media.tools.ryusei.io
 Programing
 Python
 Hosting