This is @ryusei__46.
This article explains how to deploy a web application or service developed with Next.js to on-premise environments like VPS servers or self-hosted systems.
When I first started learning Next.js, most tutorials focused on deploying to Vercel, leaving limited information about hosting on on-premise infrastructure.
Deploying to Vercel offers convenient built-in systems, making it quite straightforward. However, compared to VPS hosting, it comes with higher monthly fees (currently $20 as of December 9, 2025) and lacks the same level of flexibility. These factors represent its main drawbacks.
For my use case, where I also run other languages like Python and PHP along with databases such as MySQL on a VPS, Vercel's environment didn't suit my needs.
Below, I'll document some key points for future reference.
Development Environment
For my local development environment, I'm using "Windows 11 Pro with WSL 2.0 and Ubuntu 22.04."
For this deployment, I'll be using "Conoha VPS," operated by the GMO Group. While this choice reflects my long-term experience with the service, I particularly appreciate its reasonable pricing and user-friendly management panel. Conoha VPS offers standard VPS plans along with specialized services including dedicated email servers, database servers, and more recently, GPU-powered servers optimized for AI development.
Regarding pricing, they offer frequent discount campaigns and provide 15% student discounts.
In terms of services, besides Conoha VPS, they also offer:
- "Conoha WING" for WordPress blogs
- "Conoha for Game" for creating game servers including Minecraft
- "Conoha for AI" for AI development purposes (suitable for businesses and individual developers; for personal use, I recommend their GPU-powered VPS servers)
All these services can be managed through the same unified management panel.

ConoHa VPSはひと月296円から。最新CPU搭載、超高速SSDを採用した、高性能なのにかんたんに使えるVPSです。今だけお得なキャンペーンも実施中。
Register and configure a domain
If you don't already have a domain, I'd recommend getting one from either the reliable "Muumuu Domain" or "Onamae.com." Both offer discounted first-year rates for many domains. Recently, Muumuu Domain was running a campaign where you could obtain a .com domain for free for the first year, which was quite a bargain.
My blog recently adopted the IO domain, which was trending as an attractive option at the time, but I'm slightly regretting it because IO domains are quite expensive (¥7,400 per year).

ムームードメインは、国内最大級のドメイン取得サービスです。選べるドメインは620種類以上。サイトやメールアドレスをすぐに作成できるムームーサーバーなら初期費用0円+ドメインもずっと0円でご利用いただけます。まずはドメイン検索から。

お名前.comは国内最大級のドメイン公式登録サービスです。ドメイン登録実績4000万件を超えました。人気の.com .net .jpドメインを含め630種類のドメインを取り扱っております。
While you can also acquire domains through "Conoha VPS," they generally don't offer any discounts, making the cost efficiency poor. After year one, standard pricing applies, so if you want to centralize domain management with Conoha, we recommend transferring the domains to Conoha's service after one year.
Domain DNS Settings
Once you've obtained your domain, configure the nameserver (DNS) settings. Since I'm using "Onamae.com," I open the "Nameserver Settings" page in my member dashboard.
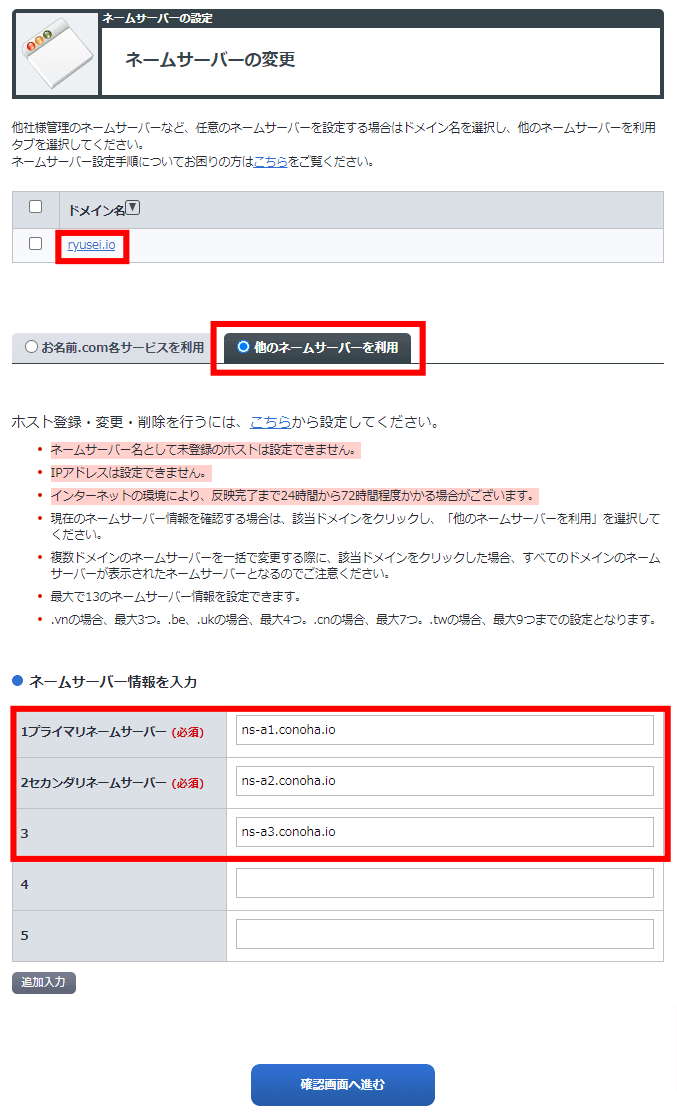
Configure the above settings to route traffic to Conoha VPS's DNS. Since Conoha VPS appears to have three DNS servers, enter ns-a1.conoha.io, ns-a2.conoha.io, and ns-a3.conoha.io in sequence to complete the configuration process.
Next, configure the domain you obtained through Conoha's management panel in the DNS settings.

From the left menu, click "DNS" and then "+ Domain". A form will appear for entering a new domain, so enter the domain you just acquired and add it.
You will then see the added domain appear below. Click on it and configure the necessary records as needed.
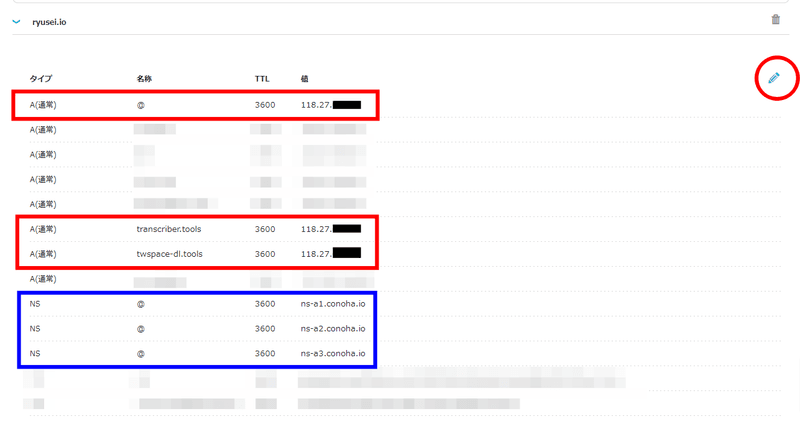
The red-bordered section shows the domain settings for this site and our current services. Please refer to this: the "Name" field requires input when setting up a subdomain, while the "Value" field should contain the server's IP address.
The blue-bordered section contains the DNS records automatically inserted when adding a domain.
To add new records, click the ✐ pencil icon in the top-right corner of the image.
when building a new server
You can add a new server from the "+ Add Server" option in the left menu of your Conoha VPS control panel.
It seems they've recently updated the control panel, now offering both "Control Panel Version 2.0" (the old version) and "Control Panel Version 3.0" (the new version). The images below show the new version.
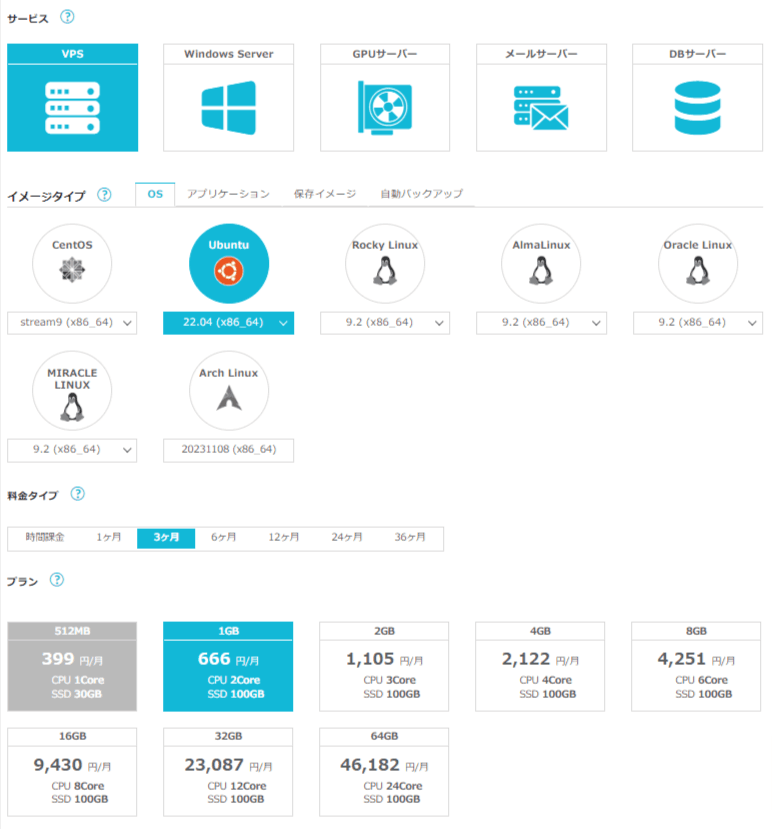
様々なOS・各種ディストリビューションからサーバーを構築できます。また、料金プランも柔軟に選択できます。短期で使用したい場合は「時間課金」がおすすめですが、長期の場合は「3ヵ月」以上のプランがおすすめですね。
また記事を書いた時点だと、Ubuntuで一番最安の月額399円プランが利用不可になっていますが、旧バージョンの管理パネルに切り替えると選択できるようになっていました。
また、新規サーバー構築時に自動でインストールされるアプリケーションも選択できるようになっています。
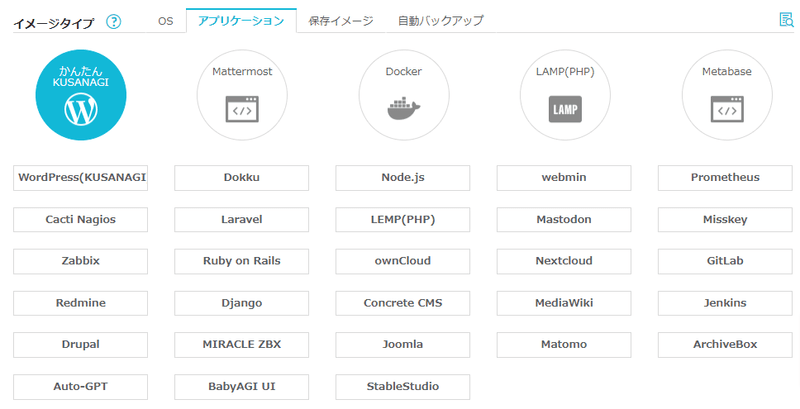
In addition to WordPress and other various CMS systems, it can automatically install web development frameworks like Laravel and container management tools such as Docker.
Deploying Next.js to Conoha VPS
Now let's prepare to deploy your Next.js project from the local environment to a Conoha VPS.
First, if your project uses environment variables through a .env file, define those for the production environment. To build your project using production environment variables during deployment, add a .env.production file, modify the values to match your production environment settings, and save it.
The detailed structure of a .env file looks like this:
File | Use | Supported Environments | Priority | Usage Frequency |
|---|---|---|---|---|
.env | Loaded in all environments. Use to define environment-independent, common variables. | All Environments | 4 | 高 |
.env.development | Loaded in the development environment. Used when defining variables in the development environment. | Development Environment (when running | 3 | 高 |
.env.production | Loaded in production environment. Use when defining variables in production. | Production environment (when running | 3 | 高 |
.env.local | Loaded in all environments. Use this to define sensitive information like API keys or database passwords that are environment-independent. | All Environments | 2 | 低 |
.env.development.local | Loaded in the development environment. Use this to define sensitive information such as API keys and database passwords in the development environment. | Development Environment (when running | 1 | 中 |
.env.production.local | Loaded in production. Use this to define sensitive information like API keys or database passwords for the production environment. | Production environment (when running | 1 | 中 |
For more details, please refer to the following article.

Next, build your Next.js application using the pnpm run build command.
Then, upload your entire project directory to the server you set up on Conoha VPS via SSH.
For this deployment, we'll use the rsync command to easily synchronize your local environment with the remote server.
$ rsync -rtuvz --delete --exclude="node_modules" --exclude=".git" --exclude=".vscode" --exclude=".env" --exclude=".env.production" -e "ssh -p [port number] -i [key file path]" [local project root path] [user]@[server ip address]:[remote project root path]When you want to apply changes from your local environment to your production environment, you should run this command each time. However, typing the command repeatedly can be tedious, so it's better to save it as a shell script file (e.g., upload-rsync.sh) and enable execution directly from the command line.
Additionally, since production environments typically run only in production mode, uploading just the contents of the .next/ directory should be sufficient.
Once uploaded, you can complete the process by logging into your production server via SSH and rerunning the pnpm run start command.
Also, the following article explains how to run multiple Next.js projects on a VPS while separating them by port numbers. When actually deploying to a production server, you'll need to set up reverse proxy configuration using Nginx or Open Lite Speed.
This guide explains how to deploy multiple Next.js web applications on the same server using reverse proxy functionality, with Open LiteSpeed as the reverse proxy solution.