
This is @ryusei__46 speaking.
In this guide, I'll explain how to self-host multiple Next.js applications on a VPS or similar environment by assigning each app to a specific port number, then using a reverse proxy to route incoming requests based on the requested domain.
While this works fine when you're only hosting a single web application, using the default HTTP ports 80 and 443 exclusively can cause problems if you want to use those ports for other services.
Setting up a separate server for each application is both resource-inefficient and impractical.
In personal development or small-scale business settings, the primary goal is to operate with minimal ongoing costs.
Of course, this changes when your service becomes popular and your server resources become insufficient—in that case, different considerations apply.
After reading this article, you'll understand the following:
- How to configure a reverse proxy
- How to run multiple Next.js instances as needed
- How to route Next.js applications by port number
Server Environment
- OS: Ubuntu 22.04(Windows 11 Pro WSL2)
- Node.js ver 20.51
- Next.js ver 14.0.2
- Open Lite Speed ver 1.7.10(Use as reverse proxy)
How to Configure a Reverse Proxy
For this setup, we will use "Open Lite Speed" as a reverse proxy.
"Open Lite Speed" is an open-source web server software that has been gaining market share in recent years as a competitor to Nginx. It operates with high performance and is commonly used for hosting WordPress sites and PHP applications. However, it also incorporates proxy server functionality, making it suitable for use as a reverse proxy for internal services.
What is a reverse proxy?
A reverse proxy refers to a proxy server that receives requests from clients and forwards them to specific servers. Unlike conventional proxies, these are specifically set up to serve dedicated servers rather than handling requests from unspecified clients. For clients, they function as service gateways—typically, clients are unaware of the reverse proxy's existence.
While Nginx would suffice if you only need it for reverse proxy use, Open Lite Speed includes a GUI-based web management panel that makes configuration much smoother.
For this setup, we'll be using Open Lite Speed.
Install Open Lite Speed and required packages
First, remote login to the server and add the repository using the following command:
$ sudo wget -O - http://rpms.litespeedtech.com/debian/enable_lst_debian_repo.sh | sudo bashOnce you've added the repository, install Open Lite Speed.
$ sudo apt-get install -y openlitespeedAfter installation completes, run the following command to verify the service is running.
$ systemctl status lsws

● lshttpd.service - OpenLiteSpeed HTTP Server
     Loaded: loaded (/etc/systemd/system/lshttpd.service; enabled; vendor preset: enabled)
     // activeになっていればOK
     Active: active (running) since Tue 2023-10-31 06:26:54 JST; 2 weeks 3 days ago
   Main PID: 942843 (litespeed)
     CGroup: /system.slice/lshttpd.service
             ├─941746 lsphp "" "" "" "" "" "" "" "" "" "" "" "" "" "" "" "" "" "" "" "" "" "" ">
             ├─942843 "openlitespeed (lshttpd - main)"
             ├─942844 "openlitespeed (lscgid)"
             ├─942853 "openlitespeed (lshttpd - #01)"
             ├─942854 "openlitespeed (lshttpd - #02)"
             ├─950419 lsphp "" "" "" "" "" "" "" "" "" "" "" "" "" "" "" "" "" "" "" "" "" "" ">
             ├─950420 lsphp "" "" "" "" "" "" "" "" "" "" "" "" "" "" "" "" "" "" "" "" "" "" ">
             └─950590 lsphp "" "" "" "" "" "" "" "" "" "" "" "" "" "" "" "" "" "" "" "" "" "" ">
Next, execute the following shell script to configure the initial settings for the administrator user:
$ sudo /usr/local/lsws/admin/misc/admpass.shNext, install the dedicated PHP package required for Open Lite Speed.
$ sudo apt-get install lsphp82 lsphp82-common lsphp82-curl lsphp82-mysql lsphp82-opcache lsphp82-imap lsphp82-opcache
// シンボリックリンクを作成
$ sudo ln -sf /usr/local/lsws/lsphp82/bin/lsphp /usr/local/lsws/fcgi-bin/lsphp5
Once complete, access http://localhost:7080 in your browser.
The login screen will appear—use the administrator user you initially set up to log in.
Configure Reverse Proxy Settings with Open Lite Speed
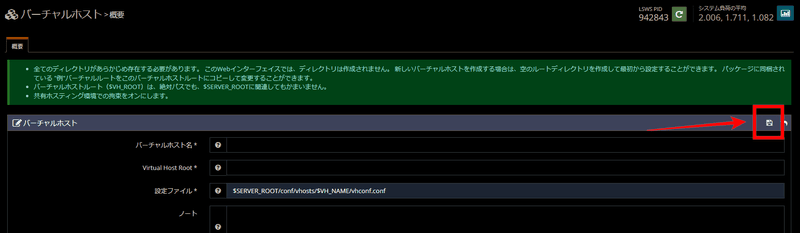
From the menu on the left, select "Virtual Hosts," then click the "+" button to the right of the heading labeled "Virtual Host List."

On the next screen, enter the various configuration items. The main items you need are as follows:
- Virtual Host Name: Set a name that is easy for you to manage
- Virtual Host Root: Absolute path to the project root of your Next.js app
- Configuration File:
$SERVER_ROOT/conf/vhosts/$VH_NAME/vhconf.conf(this should work by default) - Allow Symbolic Links: Yes
- Enable Scripts/External Apps: Yes
- Suppressed: Yes
- External App UID Mode Configuration: Server UID
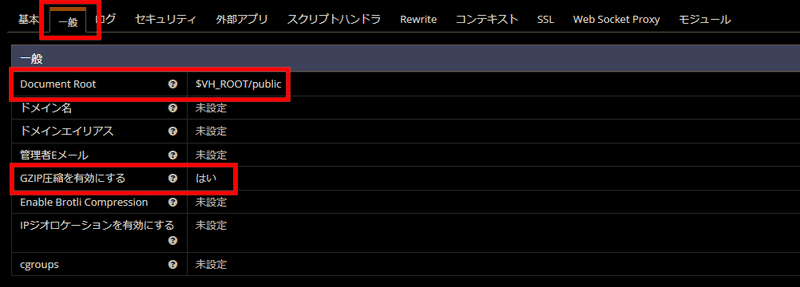
Once you've added the settings, click the virtual host name from the virtual host list to open the details screen.
Select the "General" tab and focus on the section outlined in red
- Document Root:
$VH_ROOT/public(since all requests will be proxied to Next.js, any settings here are acceptable.) - Enable GZIP compression: Yes
set to.
Next, configure settings under the "External Apps" tab.
Select "Web Server" from the "Type" dropdown and proceed. On the next page,
- Name: Set a preferred name in alphanumeric format
- Address: Specify the actual port on which Next.js should run, along with the local loopback IP address (e.g.,
http://127.0.0.1:8624) - Maximum Connections: 500
- Keep-Alive Timeout: 10 seconds
- Initial Request Timeout (seconds): 15
- Retry Timeout (seconds): 10
- Response Buffering: Yes
to add an external app.
Next, configure settings under the "Context" tab. Use the "+" button to open the context configuration page, then select "Proxy" from the "Type" dropdown to continue. On the next page,
- URI: / (configure the root path to forward all incoming requests to the external app's specified port number)
- Web Server: Select the external app configured earlier
and save it.
Next, add HTTP listener settings. From the right-side menu, click "Listeners," then use the "+" button to add configurations.
- Listener Name: Set a clear, identifiable name
- IP Address: Select "ANY IPv4"
- Port: 80
Saving this configuration will enable an HTTP listener to bind to the standard port 80.
Finally, let's configure the domain.
Select the HTTP listener you just added from the listener list, then click the "+" button to the right of the "Virtual Host Map" header to configure the domains you want to assign to your application.
- Virtual Host Map: Select the virtual host added above from the drop-down menu
- Domain: Specify the domain to assign (e.g., blog.localhost or example.com)
Once configuration is complete, click the "Restart" button in the top-right corner to apply all settings.
You will need to complete the above configuration for each Next.js application you want to deploy.
This concludes the Open LiteSpeed configuration process.
Start as many Next.js servers as needed
Now, let's use the screen command to manage multiple Next.js instances.
What are screen commands?
The screen command is a tool for managing multiple terminal sessions simultaneously. With this command, you can start multiple screen sessions, each containing multiple windows. By arranging processes across different sessions, you can isolate running processes on your terminal.
The operation itself is straightforward. On Linux, it's already included by default, so you don't need to install it separately. First, open a terminal and type screen followed by Enter.
A new terminal session will then start. Use the cd command to navigate to your Next.js project directory, then start the Next.js server on the port number configured as the external application port for your Open LiteSpeed virtual host.
Once launched successfully, exit the session by pressing Ctrl + A followed by D. To reconnect later, use the screen -ls command to list all currently running terminal sessions. Identify the screen ID (a numerical value) at the beginning of each entry, then reconnect with screen -r [screen ID].
Note: To scroll through screen output within a session, switch to copy mode by pressing Ctrl + A followed by [. This allows you to use the arrow keys to scroll through the logged output on the screen.
For more comprehensive information on the screen command's usage, the following Qiita article provides useful reference material:

かなり基本的な操作について screenを使ったことがない人は、たぶん + という操作に慣れないと思う。慣れればなんてことはないだろうけど。 3つの目的別に説明。 (1)スクリーンでセッションを保存 (2)スクリーンで画面分割 (3)スクリーンでマウスを使...
This concludes the explanation. Next, we'll create terminal sessions as needed.
While there's an open-source tool called PM2 for managing Node.js instances that I'd like to use, I haven't yet implemented it. When I've got the time, I'll catch up and write a follow-up article about it.
For now, here's the official PM2 website:

PM2 is an advanced production process manager for Node.js applications with built-in load balancer, zero-downtime reload, startup scripts, monitoring, and microservice management features.
Conclusion
As expected, Next.js deployments are typically hosted on Vercel, and there seems to be limited practical knowledge available about self-hosting options. Since I've worked with PHP and WordPress in the past, I was already familiar with Open LiteSpeed. While Nginx is also lightweight, having web-based management tools makes the setup significantly more intuitive.
Using this approach, you can efficiently manage numerous Next.js servers on the same machine. Since Open LiteSpeed is primarily designed for PHP applications, you can also run WordPress and other PHP-based systems simultaneously. Moreover, because Open LiteSpeed functions as a reverse proxy, you can run servers for various languages like Ruby and Python—all on the same physical machine.
This approach feels genuinely revolutionary to me.
That's all for now. If you encounter any issues or find errors in this article, please feel free to reach out via comments, contact form, or direct message on X.