
When implementing Google AdSense ads in a Next.js App Router project, a different approach is required compared to traditional HTML-based sites. This article will explain the implementation of AdSense ads using TypeScript in Next.js App Router, along with practical component design examples.
What You'll Learn from This Article
By reading this article, you'll be able to:
- How to properly implement AdSense ads in a Next.js App Router project
- How to set up a display environment that shows ads correctly during page transitions
- How to switch between different display configurations for development and production environments
- How to place ads responsively
- How to effectively arrange multiple ads
Prerequisites
Before beginning implementation, please ensure you have completed the following preparations:
First, obtain your Google AdSense account and complete the site verification process. Once verification is complete, create an ad unit from the AdSense management console to obtain both your client ID and ad slot ID. The client ID will be a string starting with "ca-pub-", while the ad slot ID will be a numeric string.
We recommend using Next.js version 13.0.0 or higher (with the App Router support) and React version 18.0.0 or higher. Assumptions will be made that TypeScript is already configured in your project.
Additionally, since this article will use Tailwind CSS for styling, please verify that Tailwind CSS has been properly set up in your project.
Why Implementing AdSense in Next.js Is Challenging
In traditional websites, each page navigation triggers a full reload, meaning the AdSense script executes every time. With Next.js, however, client-side routing is used, so internal link navigation doesn't cause the script to run again.
As a result, ads appear on the first page visited but don't load when navigating to other pages via internal links. To fix this issue, you need a mechanism to detect page navigation and re-initialize the ads accordingly.
Implementation Steps
Setting Environment Variables
Create a .env.local file in the project root and add the following contents:
NEXT_PUBLIC_ADSENSE_CLIENT_ID=ca-pub-XXXXXXXXXXXXXXXX
NEXT_PUBLIC_ADSENSE_SLOT_ID=1234567890
For the Client ID, use the full string containing "ca-pub-", and for the Ad Slot ID, enter the numeric identifier for your ad unit. These values can be obtained from the AdSense management interface.
クライアントIDの取得方法
Access your AdSense management dashboard and navigate to "Account" → "Settings" → "Account Information." The "Publisher ID" starting with "pub-xxxxx" displayed there serves as your "Client ID." When using it, format it as "ca-pub-xxxx."

広告スロットIDの取得方法
Access your AdSense dashboard and click the "Ads" → "By Ad Unit" tab in the left menu. This will display all previously created ad units below. If you don't have any created ad units yet, create a new one by selecting "Display Ad" in the "Create a New Ad Unit" section.
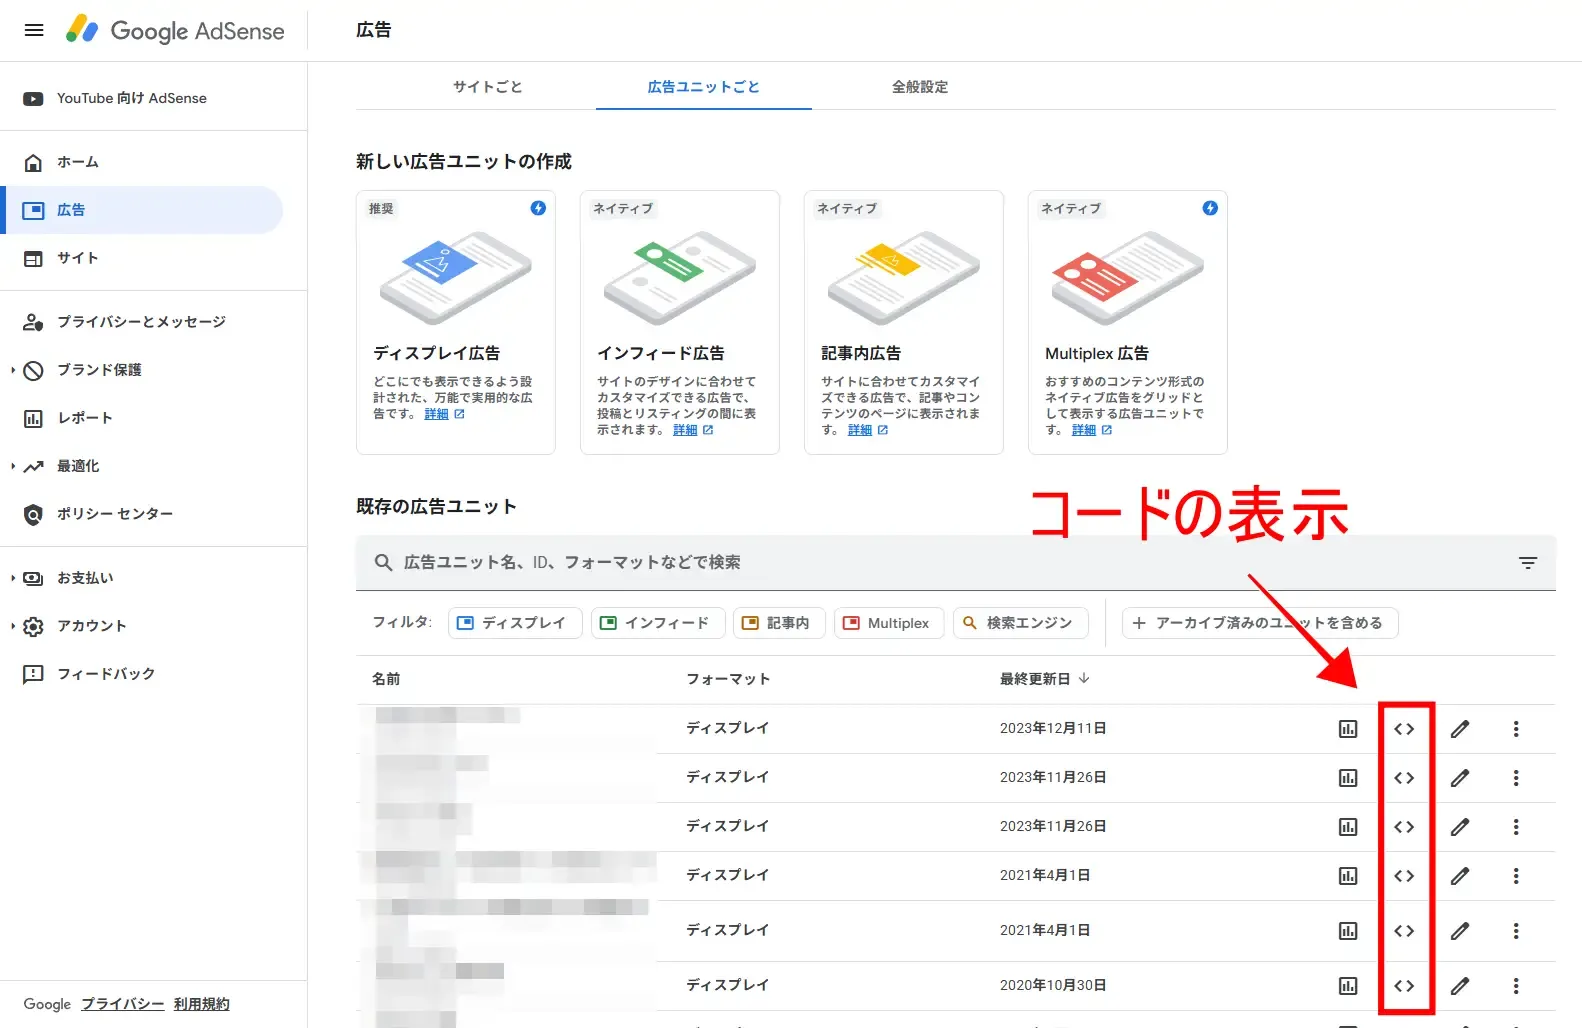
Display the ad unit code, retrieve the value of the data-ad-slot, and you're done.
<script async src="https://pagead2.googlesyndication.com/pagead/js/adsbygoogle.js?client=ca-pub-xxxxxxxxxxxx"
     crossorigin="anonymous"></script>
<!-- TRANSCRIBER - home -->
<ins class="adsbygoogle"
     style="display:block"
     data-ad-client="ca-pub-xxxxxxxxxxxx"
     data-ad-slot="xxxxxxxxxx"
     data-ad-format="auto"
     data-full-width-responsive="true"></ins>
<script>
     (adsbygoogle = window.adsbygoogle || []).push({});
</script>
Project Structure
The implementation files will follow the following structure:
src/
├── components/
│   ├── server/  # Server Components
│   │   └── scripts.tsx
│   └── adsense.tsx
└── app/
    ├── layout.tsx
    └── page.tsx
This configuration clearly separates server components from client components. scripts.tsx functions as a server component, while adsense.tsx operates as a client component.
Create Adsense Ad Component
Create a file named src/components/adsense.tsx and add the following code. This file contains a basic ad component along with several variations for different use cases.
'use client';
import { useEffect, Fragment } from 'react';
import { usePathname } from "next/navigation";

declare global {
  interface Window {
    adsbygoogle: { [key: string]: unknown }[]
  }
}

/**
 * Component to display Google Adsense ads
 *
 * Detects page navigation and automatically re-initializes ads.
 * Display placeholders in development environments and actual ads in production environments.
 *
 * @param {Object} props - Component Properties
 * @param {boolean} [props.visible=true] - Whether to display the advertisement or not. If false, display the placeholder.
 *
 * @example
 * // Show ads only in production
 * const isProduction = process.env.NODE_ENV === 'production';
 * <Adsense visible={isProduction} />
 *
 * @example
 * // Always show ads
 * <Adsense visible={true} />
 */
export function Adsense({ visible = true }: { visible?: boolean }) {
  let pathname = usePathname();
  pathname = pathname ? pathname : "";

  useEffect(() => {
    if (!visible) return;
    try {
      (window.adsbygoogle = window.adsbygoogle || []).push({});
    } catch (err) {
      console.error(err);
    }
  }, [pathname, visible]);

  return (
    <Fragment>
      {
        visible ? (
          <Fragment>
            <ins className="adsbygoogle"
              style={{ display: 'block' }}
              data-ad-client={process.env.NEXT_PUBLIC_ADSENSE_CLIENT_ID}
              data-ad-slot={process.env.NEXT_PUBLIC_ADSENSE_SLOT_ID}
              data-ad-format="auto"
              data-full-width-responsive="true"
            ></ins>
          </Fragment>
        ) : (
          <div className='w-full h-[300px] flex flex-row items-center justify-center bg-stone-300 dark:bg-stone-700'>
            <span className='text-3xl font-medium cursor-default'>広告</span>
          </div>
        )
      }
    </Fragment>
  )
}

/**
 * Responsive Adsense Ad Component
 *
 * A wrapper that allows you to add margins and custom classes to basic Adsense components.
 * By default, a 24px margin is set at the top.
 *
 * @param {Object} props - Component Properties
 * @param {string} [props.className] - Additional Tailwind CSS class names
 * @param {boolean} [props.visible] - Whether to display ads
 *
 * @example
 * // Basic Usage
 * <AdsenseResponsive visible={isProduction} />
 *
 * @example
 * // Add Custom Class
 * <AdsenseResponsive visible={isProduction} className="my-8 border-t border-b pt-8 pb-8" />
 */
export function AdsenseResponsive({ className, visible }: {
  className?: string, visible?: boolean
}) {
  return (
    <aside className={`w-full mt-6 ${className || ''}`}>
      <Adsense visible={visible} />
    </aside>
  )
}

/**
 * Adsense Ad Component with 2 Column Layout
 *
 * Place two advertisements side by side.
 * Displays in 2 columns on large screens (1024px+) and 1 column on smaller screens.
 * It can be effectively used at the end of articles.
 *
 * @param {Object} props - Component Properties
 * @param {string} [props.className] - Additional Tailwind CSS class names
 * @param {boolean} [props.visible] - Whether to display ads
 *
 * @example
 * // Place 2 column ads at the end of articles
 * <AdsenseDoubleRectangle visible={isProduction} />
 *
 * @example
 * // Add custom class
 * <AdsenseDoubleRectangle visible={isProduction} className="mb-12" />
 */
export function AdsenseDoubleRectangle({ className, visible }: {
  className?: string, visible?: boolean
}) {
  return (
    <aside className={`w-full mt-6 flex justify-center flex-wrap gap-3 ${className || ''}`}>
      <div className='w-full lg:w-[calc(50%-0.4rem)]'>
        <Adsense visible={visible} />
      </div>
      <div className='w-full lg:w-[calc(50%-0.4rem)]'>
        <Adsense visible={visible} />
      </div>
    </aside>
  )
}
The component's design incorporates several key features:
First, it uses the usePathname hook to detect page navigation. Whenever the pathname changes, the useEffect hook triggers, reinitializing the new ad. This ensures ads display correctly even with Next.js's client-side routing.
The visible property allows you to switch between different display configurations for development and production environments. When visible is set to false, a placeholder will display instead of the actual ad, making layout verification during development much easier.
We prepared three distinct components: Adsense for basic ad display, AdsenseResponsive as a wrapper that includes margin and responsive design support, and AdsenseDoubleRectangle for a special layout that arranges two ads side by side.
Adsense Script Loading Component
Create a file at src/components/server/scripts.tsx and write the component to load AdSense scripts. This component will operate as a server component.
import { AdsenseResponsive, AdsenseDoubleRectangle } from '@/components/adsense';

export default function BlogPost() {
  const isProduction = process.env.NODE_ENV === 'production';

  return (
    <article className="max-w-4xl mx-auto px-4">
      <h1 className="text-4xl font-bold mb-4">記事タイトル</h1>

      {/* 記事冒頭の広告 */}
      <AdsenseResponsive visible={isProduction} />

      <div className="prose prose-lg">
        <p>記事の導入部分...</p>
      </div>

      {/* 記事中央の広告 */}
      <AdsenseResponsive visible={isProduction} className="my-8" />

      <div className="prose prose-lg">
        <p>記事の本文...</p>
      </div>

      {/* 記事末尾の2列広告 */}
      <AdsenseDoubleRectangle visible={isProduction} />
    </article>
  );
}
This component uses Next.js's Script component to load AdSense scripts. By specifying strategy="afterInteractive", the script loads only after the page becomes interactive, minimizing performance impact.
The visible property controls whether the script loads only in production environments. This prevents consuming AdSense ad impressions during development while also avoiding unnecessary network requests.
Integrate into layout file
Open the src/app/layout.tsx file and place the LoadAdsenseScript component.
import type { Metadata } from 'next';
import { LoadAdsenseScript } from '@/components/server/scripts';
import './globals.css';

export const metadata: Metadata = {
  title: 'あなたのサイト名',
  description: 'サイトの説明',
};

export default function RootLayout({
  children,
}: {
  children: React.ReactNode;
}) {
  const isProduction = process.env.NODE_ENV === 'production';

  return (
    <html lang="ja" suppressHydrationWarning>
      <body>
        <LoadAdsenseScript visible={isProduction} />
        {children}
      </body>
    </html>
  );
}
By placing it in the layout file, we ensure the AdSense script loads on all pages. We use the isProduction variable to determine the environment, configuring it to load the script only in production.
Ad Placement Method
You can then use these created components on any page or component where you want to display ads. Below is an example of how to use them in a blog post page.
import { AdsenseResponsive, AdsenseDoubleRectangle } from '@/components/adsense';

export default function BlogPost() {
  const isProduction = process.env.NODE_ENV === 'production';

  return (
    <article className="max-w-4xl mx-auto px-4">
      <h1 className="text-4xl font-bold mb-4">記事タイトル</h1>

      {/* Article Headline Ads */}
      <AdsenseResponsive visible={isProduction} />

      <div className="prose prose-lg">
        <p>Article introduction...</p>
      </div>

      {/* Article Center Ad */}
      <AdsenseResponsive visible={isProduction} className="my-8" />

      <div className="prose prose-lg">
        <p>Article Body...</p>
      </div>

      {/* Two column ads at article bottom */}
      <AdsenseDoubleRectangle visible={isProduction} />
    </article>
  );
}
This code example demonstrates placing ads in three different locations: a single ad at both the beginning and center of the article, and two ads side by side at the end.
By passing isProduction to the visible property, placeholder ads appear in development environments while actual ads display in production.
Detailed Component Description
"Adsense" Component
The core Adsense component provides the fundamental functionality for displaying advertisements. A key feature of this component is its combination of the useEffect and usePathname hooks.
usePathname is a Next.js App Router hook that retrieves the current path, returning a new path value whenever the page navigation changes. By including this path in the useEffect dependency array, we ensure that advertisements are properly reinitialized during page transitions.
When visible is set to false, a placeholder using Tailwind CSS will be displayed. This placeholder is configured with a height of 300px, providing space comparable to an actual advertisement. It also includes dark mode support, automatically switching the background color accordingly.
"AdsenseResponsive" Component
AdsenseResponsive is a wrapper component that allows you to add margins and custom classes to basic ad components. By default, it applies a 24px margin at the top to ensure proper spacing between content and ads.
The className property provides flexible support for additional styling. For example, you can specify className="my-8 border-t border-b pt-8 pb-8" to add borders and padding above and below the ad. The class names are combined using standard template literals, so no additional libraries are required.
"AdsenseDoubleRectangle" component
The AdsenseDoubleRectangle is a layout component designed for in-article display that arranges two advertisements side by side. It features a responsive design that automatically switches between a two-column layout on larger screens and a single-column layout on smaller devices.
The breakpoint is set to lg (1024px), meaning on screens wider than this, each advertisement will occupy approximately 50% of the available width. A 12px gap is maintained between the advertisements to ensure proper spacing.
This arrangement is particularly effective at the end of articles. By presenting readers with two advertising options after they have finished reading, you can improve click-through rates.
Switch between development and production environments
This implementation uses the visible property to control display behavior across different environments. There are several advantages to this approach:
First, it prevents consuming Adsense ad delivery quotas during development, ensuring accurate performance data for production environments. It also eliminates any Adsense-related warnings or error messages that may appear in the developer console.
Additionally, the placeholder display allows developers to visually verify both the position and size where actual ads will appear, simplifying layout adjustments. The dark mode compatibility ensures the placeholder displays properly regardless of the site's theme.
Environment detection uses process.env.NODE_ENV, but for more granular control, you can also use custom environment variables. For example, you could add a NEXT_PUBLIC_SHOW_ADS=true variable in .env.local and use this to control display logic.
Common Problems and Solutions
Ads not appearing after page navigation
In Next.js's client-side routing, scripts aren't re-run during page navigation, so the ad initialization code doesn't execute either.
This issue has been resolved by including pathname in the useEffect dependency array of the provided component. The ad initialization code runs whenever the path returned by the usePathname hook changes, ensuring the ad displays correctly even after navigating to internal pages.
If the ad isn't appearing, please verify that pathname is properly included in the useEffect dependency array.
"nscript" related warnings appear in the console
You may occasionally see a warning in your browser's developer tools stating "AdSense head tag doesn't support data-nscript attribute." This warning occurs due to an attribute that Next.js's Script component adds internally and does not affect actual ad delivery.
This warning is unavoidable due to specifications in both Next.js and AdSense, but there's no issue with ad display or functionality, so don't worry. Google has also confirmed that ad delivery itself operates normally.
If you wish to completely avoid this warning, you could instead dynamically load the script within useEffect instead of using the Script component, though from performance considerations, we recommend maintaining the current implementation.
I want to view actual ads in my development environment
There may be cases where you want to verify actual ad display even in development environments. In such cases, you can either directly set the visible property to true or use environment variables to control the visibility.
However, be aware that frequently loading ads during development may violate Adsense policies. It's recommended to limit testing to a minimum and primarily use placeholders to verify layout.
Ad Blocker Countermeasures
Impact from ad blockers
Ad blockers are browser extensions or apps that remove advertisements from websites. They are estimated to be used by about 15-20% of Japanese internet users, with particularly high adoption rates on technology-related sites where users tend to have higher IT literacy.
When ad blockers are active, AdSense ad scripts and ad elements fail to load, resulting in decreased impression counts and ultimately leading to revenue loss. With the switch to an impression-based revenue model starting February 2024, the impact of unviewed ads has become even more direct.
AdSense's official ad blocker countermeasure feature
Google provides a built-in feature called "Recovering Lost Revenue from Ad Blocking." This functionality allows you to display a modal message to users who are using ad blockers, encouraging them to enable ads.
You can configure this feature under "Privacy and Messages" → "Recovering Lost Revenue from Ad Blocking" in the AdSense management interface. You can customize the message content to either request users to disable their ad blocker or add your site to their allowed list.
After configuration, simply add the generated script to your site's <head> tag, and the automatic ad blocker detection and message display mechanism will activate. This feature can help some users remove their ad blocker, potentially recovering lost revenue.
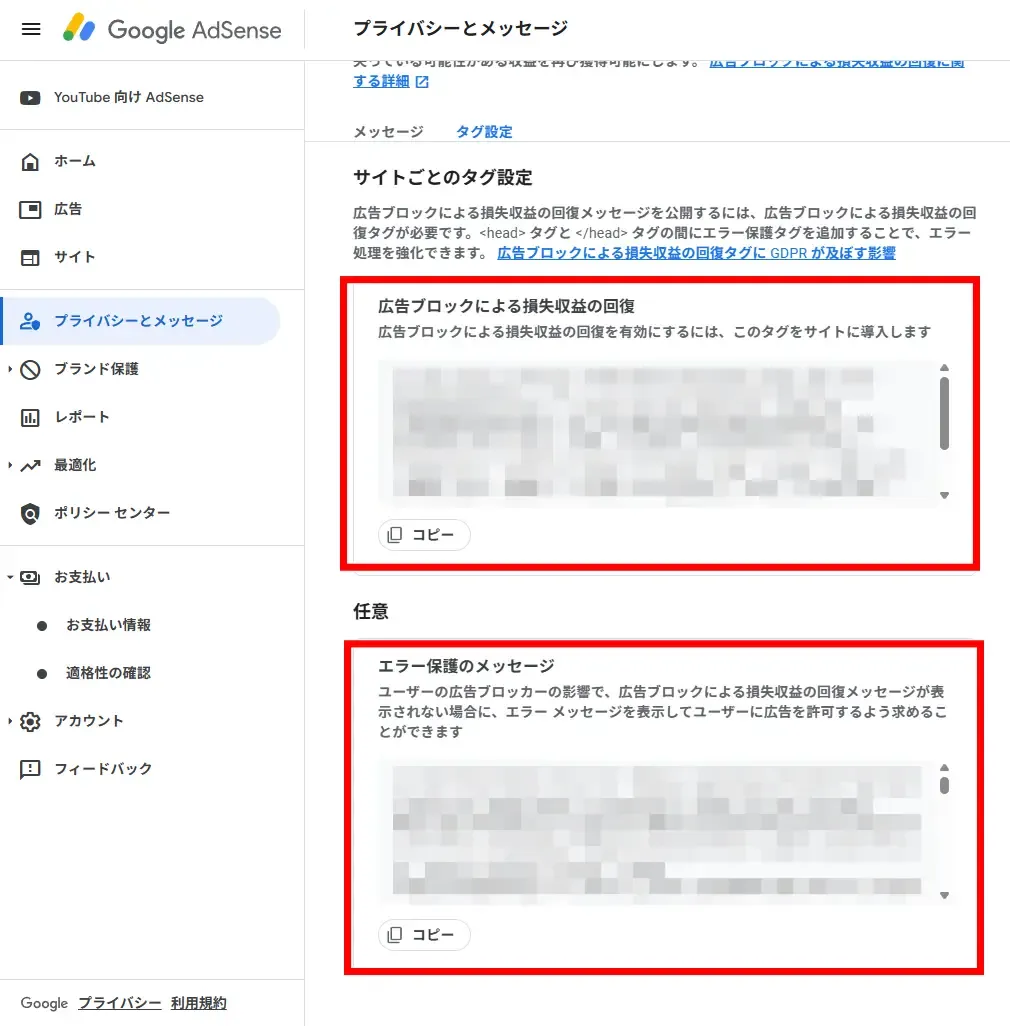
We recommend configuring both "Recovering lost revenue from ad blocking" and "Error protection messages."
To implement this feature in Next.js, you can either integrate it as an additional Script component in the src/components/server/scripts.tsx file you created earlier, or directly add it to the head section of src/app/layout.tsx.
When implementing anti-ad-blocker measures, we recommend keeping the message content non-intrusive to avoid negatively impacting user experience. Clearly explaining that ads are necessary to cover your site's operational costs and maintain quality will help gain user understanding.
Performance Optimization
AdSense ads can potentially impact your site's performance. By implementing the following optimization methods, you can deliver ads without compromising user experience.
Script Loading Strategy
The component we provide uses strategy="afterInteractive", which means the script loads after the page becomes interactive.
Another option available is strategy="lazyOnload", a more performance-focused strategy that loads scripts after the browser becomes idle. However, this may result in slightly delayed ad rendering.
For high-traffic sites, afterInteractive provides an appropriate balance. For sites with low traffic where performance is the top priority, consider using lazyOnload.
Minimize Layout Shift
When ads load, content may shift, negatively impacting user experience. To prevent this, you need to properly set the height for the ad container.
Our placeholder is configured at 300px height to accommodate common ad sizes. By adjusting this to match actual ad sizes, you can minimize layout shifts.
Additionally, Adsense's responsive ad units automatically adjust their size according to the container's dimensions, making them less likely to cause layout shifts.
Ad Placement Strategy
Ad placement significantly impacts both performance and user experience. By following these guidelines, you can achieve optimal ad placement:
We recommend avoiding ads in the "above-the-fold" area—the first visible screen content. This ensures faster initial content loading, allowing readers to begin consuming your content immediately.
Placing ads in the middle or at the end of articles allows you to display them after readers have engaged with the content. Since February 2024, AdSense has transitioned from its traditional click-based (CPC) model to an impression-based (CPM) revenue model. This change aligns with the industry standard for display advertising, where revenue is generated simply by displaying the ad. Strategic ad placement can increase view counts and boost your earnings.
The AdsenseDoubleRectangle component is particularly effective at the end of articles. It allows readers to naturally shift their attention to the ad after finishing the content.
Use with automatic ads
In addition to manually placing ad units, you can also use Google's automatic ad placement feature, which optimizes ad placement automatically.
To enable automatic ads, simply configure settings in the AdSense admin panel and then place the LoadAdsenseScript component—no individual ad unit components are required, allowing for simpler implementation.
However, if you want to precisely control ad placement locations or maintain specific layout requirements, please use the manual placement method described in this article.
Using both methods simultaneously is possible, but be cautious not to overcrowd your page with ads. Google's policies may penalize excessive ad placement.
Checklist Before Deployment to Production Environment
Once implementation is complete, verify the following items before deploying to production:
First, ensure environment variables are properly configured. Check that the contents of your .env.local file match the environment variable settings in your deployment environment. If using a hosting service like Vercel, you can configure environment variables through the admin panel.
The following two environment variables are mandatory:
NEXT_PUBLIC_ADSENSE_CLIENT_ID: Full client ID (including ca-pub-)NEXT_PUBLIC_ADSENSE_SLOT_ID: Ad slot ID
First, verify that your site is approved in the AdSense admin dashboard and that your ad units have been created correctly. If your site isn't approved, no ads will appear.
Also, check that the visible property of the LoadAdsenseScript component is properly configured according to your environment. It should be set to true for production environments and false for development environments.
Ensure that the import path for the component is correct as well. If TypeScript's path aliasing (@/) isn't properly configured, this may cause build errors.
Finally, make sure you're compliant with Google's policies. Avoid placing ads in inappropriate content or in ways that might encourage accidental clicks, as this could negatively impact user experience.
After deployment, visit the actual site to verify that the ads are displaying properly. It may take anywhere from a few minutes to several hours for the ads to appear.
Conclusion
We’ve walked through implementing AdSense ads in a project using Next.js App Router and TypeScript, complete with practical component design considerations.
The key points to note are: using the usePathname hook to detect page navigation and reinitialize ads accordingly. Additionally, using the visible property to enable different display configurations between development and production environments helps balance development efficiency and production performance.
The components provided here offer flexible design capabilities, supporting everything from basic ad display to complex layout configurations. Please customize these components according to your project’s specific needs.
By applying the implementation methods introduced in this article, you can achieve stable ad delivery. We recommend regularly checking performance in the AdSense admin panel and adjusting ad placements and settings as needed.