This is @ryusei__46 speaking.
In this article, I've created a CMS-like system that enables article posting similar to WordPress using Next.js. If you're looking to run a blog or personal website with Next.js from now on, I'd highly recommend using this template as a starting point.
The blog template I've developed here is a direct copy of our actual site's source code, so if you're looking to make significant design changes, this approach might actually add extra work. In such cases, it may be better to start from scratch with Next.js development.
Developing a blog or website system entirely from scratch using Next.js can be quite challenging. Considering I was learning as I went, it took about two and a half months to finally get everything up and running.
If you build each page on demand and create your blog/website as a complete static site generator (SSG), development should progress fairly smoothly. However, adding management functionality suddenly increases the required effort dramatically.
However, by adding a content management feature,
- Easy article posting
- No need to add Markdown or HTML files page by page for building, significantly reducing development effort
- Reduced build size
- Reduced build time
- By managing articles in a database, you can implement logic for related article display, comment functionality, and category associations
and many other essential features for CMS systems.
A blog and website creation and management system developed using Next.JS. This is a super boilerplate. - ryusei-48/next-creator
With this in mind, I'll now explain the details of my created template.
Specifications for the Created Blog Template (Tentative Version)
※This blog template is still under development, and we will continue adding features gradually. Additionally, there are many bugs present, so users will need to make their own modifications as needed.
- Post and edit articles (including drafts and permalink settings)
- Media Library
- Category Management
Other elements like logic and page layout are similar to this site's, so you can use those as is, but you'll likely need to customize them individually.
Structure and file structure of the created blog template
This blog template is built using Next.js 14.0.2 with the App Router.
First, let me list the packages we're using and our development environment.
Used Packages
dependencies:
@next-auth/prisma-adapter 1.0.7                   file-type 18.5.0                                  next-auth 4.24.3                                  @prisma/client 5.4.2                              jschardet 3.0.0                                   nodemailer 6.9.6
bcrypt 5.1.1                                      jsdom 22.1.0                                      sanitize-html 2.11.0                              ckeditor5-custom-build file:lib/ckeditor5-custom  negotiator 0.6.3                                  sharp 0.32.6
cookies-next 4.0.0                                next 14.0.2

devDependencies:
@formatjs/intl-localematcher 0.4.2         @types/negotiator 0.6.2
prisma 5.4.2                               @fortawesome/fontawesome-svg-core 6.4.2
@types/node 20.8.7                         react 18.2.0
@fortawesome/free-brands-svg-icons 6.4.2   @types/nodemailer 6.4.13
react-dom 18.2.0                           @fortawesome/free-regular-svg-icons 6.4.2
@types/react 18.2.31                       react-hook-form 7.47.0
@fortawesome/free-solid-svg-icons 6.4.2    @types/react-dom 18.2.14
react-select 5.7.7                         @fortawesome/react-fontawesome 0.2.0
@types/sanitize-html 2.9.3                 sass 1.69.4
@types/bcrypt 5.0.1                        animate.css 4.1.1
tocbot 4.21.2                              @types/jsdom 21.1.4
highlight.js 11.8.0                        typescript 5.2.2
The ckeditor5-custom-build package contains a custom build of CkEditor 5, including both official plugins and custom-implemented plugins.
What is CkEditor 5?
CKEditor 5 is a WYSIWYG (What You See Is What You Get) editor that provides real-time preview functionality for text formatting and layout adjustments. It allows users to easily apply formatting and layout changes without requiring specialized HTML knowledge. CKEditor 5 is open source, lightweight, and boasts the distinction of being one of the oldest WYSIWYG editors available. The WYSIWYG editor is also used in the article editing interface of WordPress.
Directory Structure
├── app
│   └── [lang]  // Language Detection Parameter
│       ├── admin  // Pages of the administration panel
│       │   ├── category
│       │   ├── media
│       │   ├── post
│       │   └── post-list
│       ├── api
│       │   ├── auth  // Authentication process used for logging into the administration panel
│       │   ├── blogcard  // Fetch Blog Card Information
│       │   ├── category
│       │   │   ├── create
│       │   │   ├── get
│       │   │   │   ├── related-post
│       │   │   │   └── route.ts
│       │   │   ├── slug-exist  // Get Categories from Slug
│       │   │   └── update
│       │   ├── contact  // Email sending process used in inquiries
│       │   ├── discussion  // Manage article comments
│       │   │   ├── create
│       │   │   └── get
│       │   ├── get-media
│       │   ├── get-media-first
│       │   ├── media-stream  // Stream images from stored media
│       │   │   ├── icon
│       │   ├── post  // Article Information Management
│       │   │   ├── create
│       │   │   ├── get
│       │   │   ├── get-many
│       │   │   └── update
│       │   ├── register  // User Registration
│       │   ├── rm-media  // Remove Media
│       │   ├── upload  // Upload Media
│       │   └── userexist  // User Existence Check
│       ├── article  // 記事ページ
│       │   ├── [permalink]  // Display article in permalink
│       ├── auth  // User Authentication Page
│       │   ├── login
│       ├── category // Display New Articles by Category
│       │   ├── [slug]  // Display using slug
│       └── privacy-policy  // Privacy Policy Page
├── components
│   ├── small-parts
│   └── use-client
├── external  // script tags that need processing
├── lib
│   └── ckeditor5-custom
├── locales  // Language dictionary files and scripts for supporting multilingual functionality
├── prisma  // データベーススキーDatabase schema managementマの管理
│   └── migrations
└── types  // Types and Definitions Files for TypeScript Army
    ├── define-type.d.ts
    └── override-react.d.ts
By examining the directory structure above, you should be able to get a general understanding of the overall layout.
Instructions on how to use the blog templates you created.
Below we'll explain how to use this tool quickly and how to customize it.
Download templates and set up environment
You can download the source from my GitHub repository at the following link or clone it to your project directory using git clone:
A blog and website creation and management system developed using Next.JS. This is a super boilerplate. - ryusei-48/next-creator
When ready, execute the pnpm install command in the project root directory to install all required dependencies.
What is pnpm?
pnpm is one of the package managers for Node.js, similar to npm or yarn, and is used for managing project dependencies. However, pnpm possesses characteristics that set it apart from other package managers.
First, pnpm has a completely different node_modules structure. While with conventional tools like npm or yarn each package is typically copied directly into the node_modules directory, pnpm keeps all packages centrally managed globally and only creates symbolic links within the node_modules directory. This results in significantly smaller node_modules directories and improved storage utilization efficiency. Additionally, pnpm operates extremely fast when it comes to package updates.
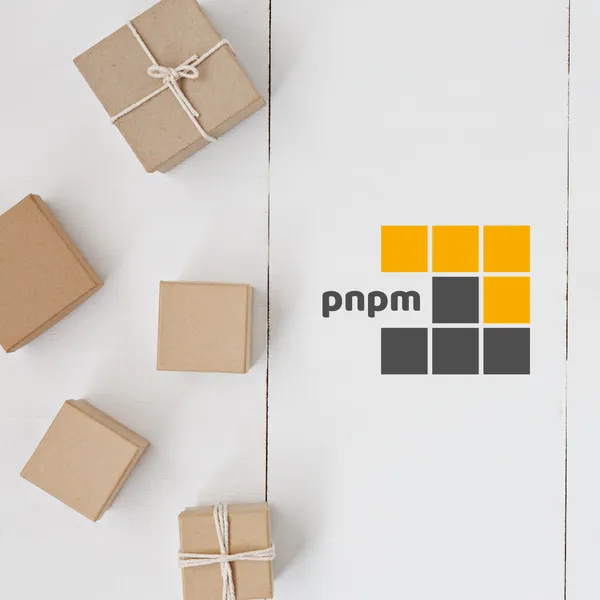
Fast, disk space efficient package manager
Set environment variables in the .env file
Since the project root contains a .env.sample file, you should first remove the .sample extension and rename it to simply .env.
When you open the newly created ".env" file, it should contain something like this, so you must modify all values to suit your specific environment:
# App settings
APP_ROOT_PATH=/var/www/next-creator  // Absolute path to the project root directory.
API_ACCESS_ADDRESS="http://192.168.1.45:8648"  // For use when fetching in server components
NEXT_PUBLIC_SITE_TITLE="site title"
APP_URL=http://ryuseiweb.localhost
NEXT_PUBLIC_APP_URL=http://ryuseiweb.localhost
API_ACCESS_TOKEN="xxxxxxxxxxxxxxxxxxxxxxxxxxxxx"

# Google Analytics
NEXT_PUBLIC_GA_MEASUREMENT_ID = "G-xxxxxxxxxx"

# next-auth
NEXTAUTH_SECRET="xxxxxxxxxxxxxxxxxxxxxxxxxxxxxxxx"
NEXTAUTH_URL=http://ryuseiweb.localhost

# smtp server setting
SMTP_HOST="smtp-mail.outlook.com"
SMTP_USER="xxxxxxx@xxxxxxxxxx"
SMTP_PASSWORD="xxxxxxxxxxx"
USE_ADDRESS="xxxxxxxxxxx@xxxxxxxxxxx"

# Prisma
DATABASE_URL="mysql://[username]:[password]@[hostname]:[port]/[databasename]"
Regarding API_ACCESS_ADDRESS While fetching with SSR, using a domain name caused errors, so we implemented direct IP address usage. Since then we've not verified this further - it's possible the bug was resolved in later Next.js versions.
Email sending server is configured to use Microsoft Outlook, but if you want to use a different SMTP server, please modify it accordingly. Note that SMTP server specifications may vary by service provider, so you'll need to adjust the nodemailer settings yourself. The relevant file is located at /api/[lang]/api/contact.
Configuration settings for the public.config.json file
At the project root, there is a "public.config.json" file. This file currently handles the site's multilingual configuration settings.
{
  "locale": {
    "default": "ja",
    "accept-lang": [ "ja", "en" ],
    "labels": {
      "ja": { "ja": "日本語", "en": "英語" },
      "en": { "ja": "Japanese", "en": "English" }
    }
  }
}
The default key specifies the default language to be applied to the site. The accept-lang key lists available language codes in an array that can be used across the entire site. The labels key allows you to configure labels to display in the language selection dropdown for each language.
*At least one language code must be configured.
Additionally, we've set up an array of language codes that can be used in the "type: AcceptLocales" configuration in TypeScript. This can be found on the third line of /types/define-type.d.ts.
Initialize the database in Prisma
First, generate TypeScript type definitions from the Prisma model using the following command:
pnpx prisma generateThen initialize the database with this command:
pnpx prisma migrate devI believe we have now created the necessary tables for our database.
Start the server
Start the server using the pnpm run dev command. Accessing http://localhost:8648 will display the blog's homepage.
Next, navigate to http://localhost:8648/auth/login, where you'll see the user registration form. Complete the registration process; upon successful registration, you'll be automatically logged in.
Once logged in, a management bar will appear at the top of the page. From here, you can edit articles, manage categories, and upload media.
*At present, only basic functionality is available, with planned updates to come regularly.
List of articles screen description
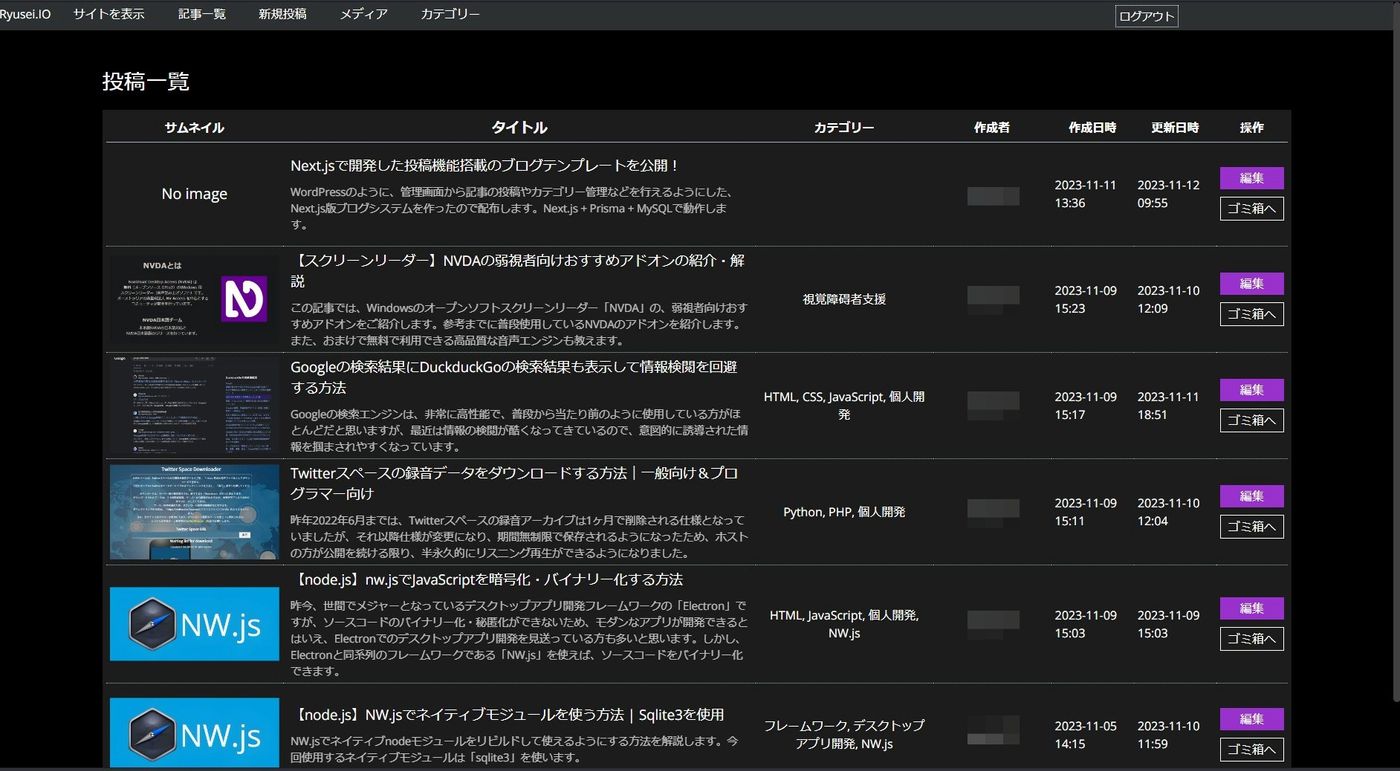
This page displays a list of all published articles. For each post, you can perform edit and delete operations.
Article Posting Screen Description
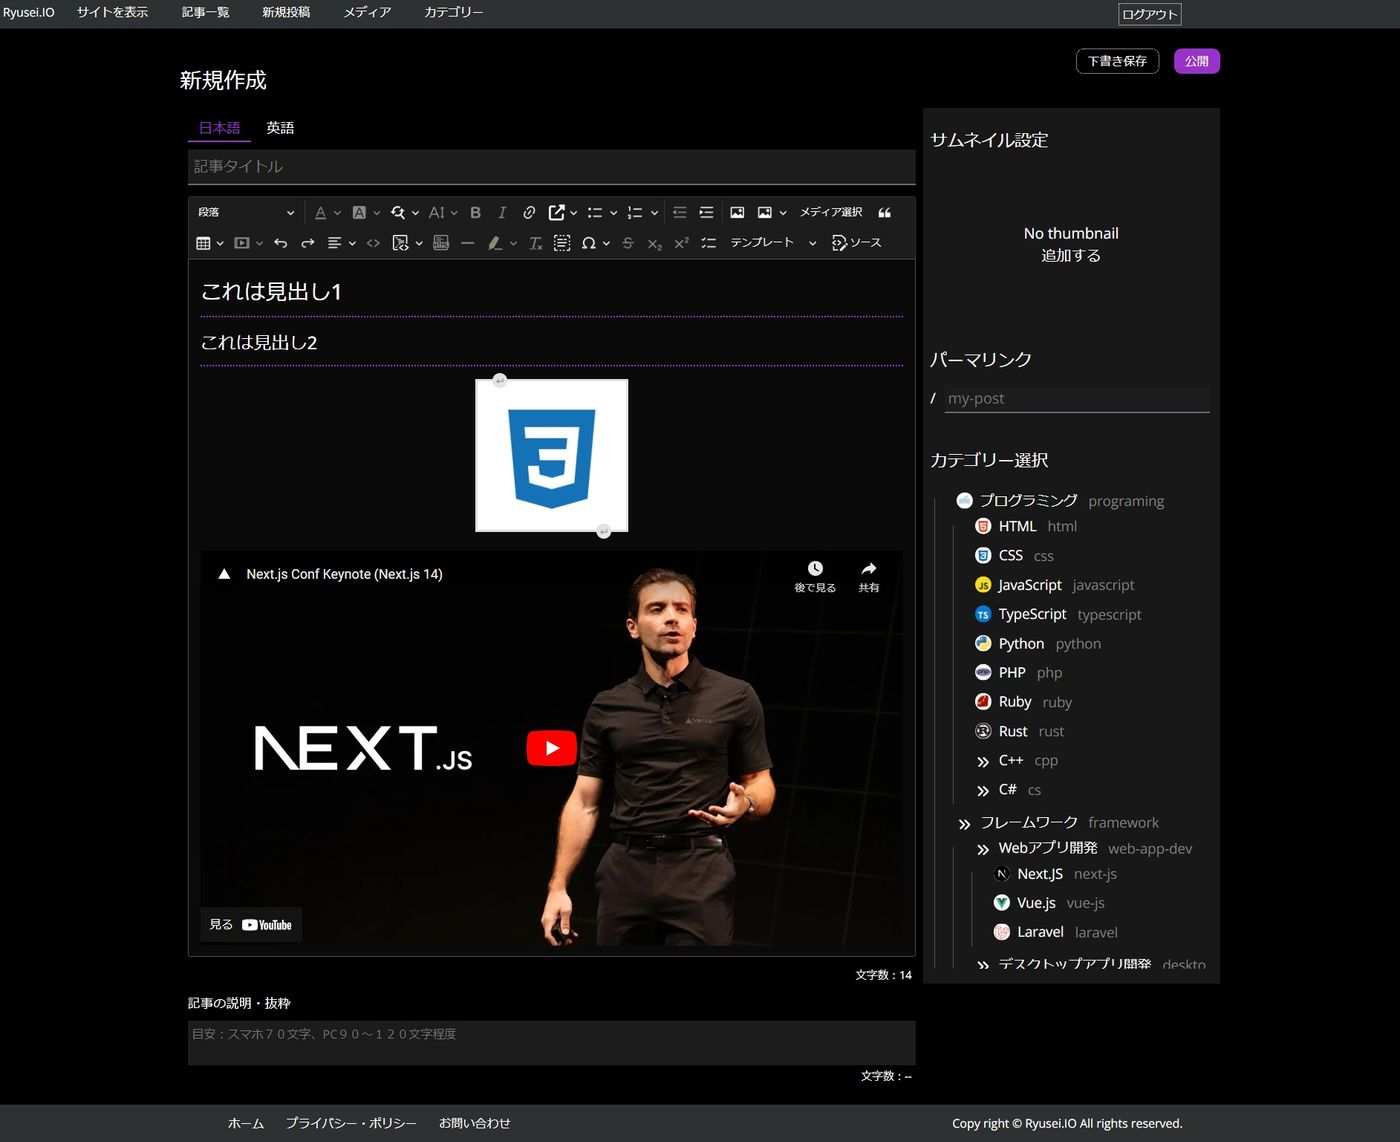
This page is used for posting and editing articles. The editor utilizes "CkEditor 5," which provides a user experience similar to WordPress's built-in editor. While it requires some effort, if you want to customize the editor to include unique blocks or widget functionality, you'll need to write your own plugin. I've already created and integrated custom blocks including supplementary blocks, blog card blocks, and media selection functionality. Additionally, I've added all officially supported free plugins provided by the CkEditor development team that seem necessary for the project.
In the language-specific tabs at the top of the editor, you can edit article content separately for each language. These tabs display content based on the language settings configured in "public.config.json."
The "Thumbnail Settings" option in the right sidebar allows you to specify an image for the article's thumbnail. If no thumbnail image is set, a default "No Image" placeholder will be inserted.
The "Permalink" setting allows you to specify a clear alphanumeric string for the URL when displaying articles, similar to WordPress's permalink system. Without specifying a permalink, the article URL will automatically include the post ID. When a permalink is set: https://example.com/article/my_post_title; without it: https://example.com/article?id=xx.
In "Category Settings," you can associate articles with predefined categories by clicking on them.
To finalize your article, click "Publish," or to save it as a draft, click "Save as Draft" to complete.
Media Library Description
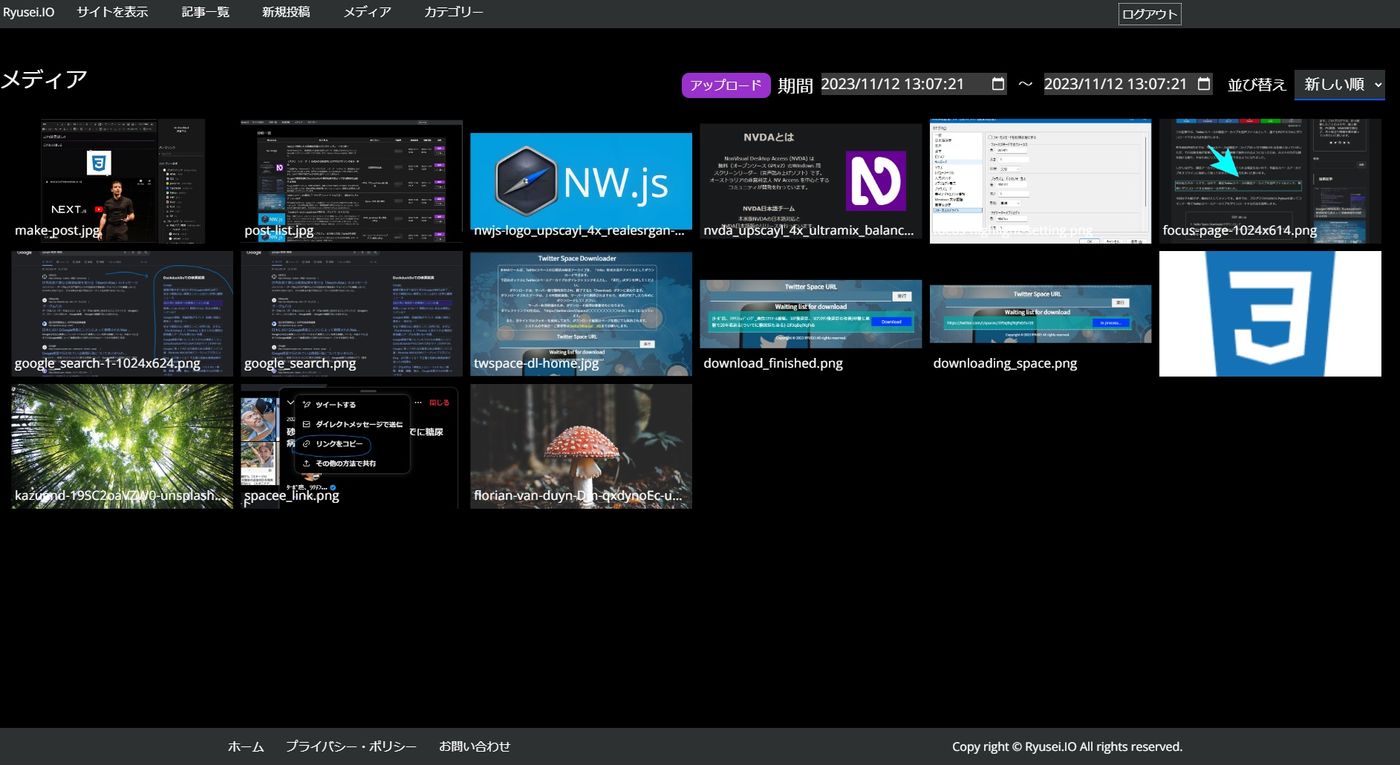
Currently, the media library only supports image uploads. We plan to add support for audio and video file uploads in the future.
Rather than uploading videos directly, we recommend uploading them to platforms like YouTube and embedding the player. This approach avoids straining server resources.
Clicking on any media item will display it in a larger view.
Category Settings Screen Description
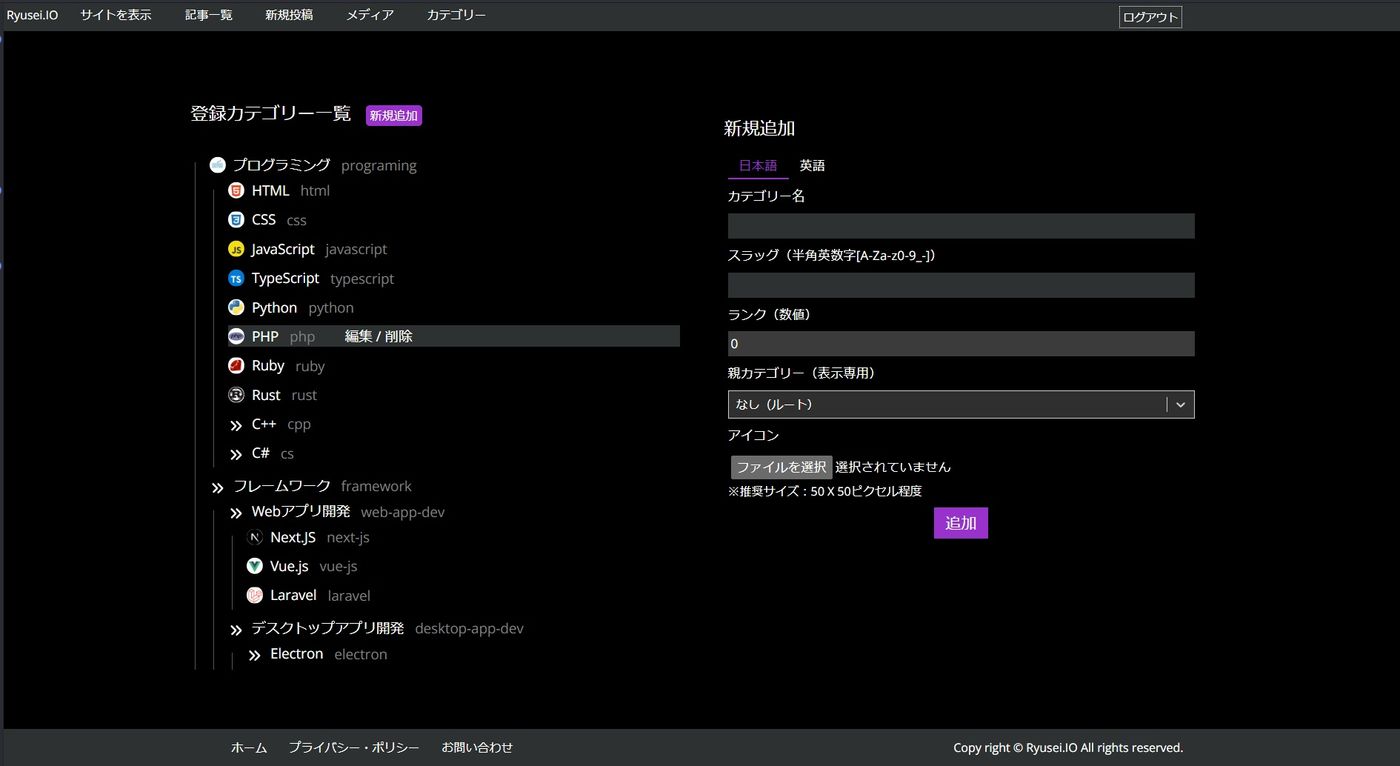
This page allows you to add, edit, or delete categories. The category settings include the category name (where you can specify labels to display in each language), slug, rank (originally intended for setting display order, though this value isn't currently used), selection of parent category, and icon image (an icon to display to the left of the category label; if unspecified, the default Font Awesome icon will be used).
Notes
The front page section functions identically to our main site, so no additional explanation is provided here. If you wish to customize the layout individually, please do so independently.
One important note: If you want to load external scripts or stylesheets, be sure to add Content-Security-Policy settings. These are located in /middleware.ts.
Currently, the configuration is set as follows:
//  ・・・・・・・
const cspHeader = `
    default-src 'self';
    script-src 'self' https://www.googletagmanager.com  https://www.google-analytics.com 'unsafe-inline' 'unsafe-eval';
    style-src 'self' 'unsafe-inline';
    style-src-elem 'self' https://fonts.googleapis.com 'unsafe-inline';
    img-src 'self' https://* blob: data:;
    font-src 'self' https://fonts.gstatic.com;
    object-src 'none';
    base-uri 'self';
    form-action 'self' *;
    frame-ancestors 'none';
    block-all-mixed-content;
    upgrade-insecure-requests;
  `;
//  :::::::
Conclusion
By building this CMS-like system with Next.js this time, I've finally been able to move away from WordPress. I'm extremely satisfied with this current system. While we still need to add features and fix bugs, I want to continue developing it while learning and enjoying the process.
The template I developed doesn't include any comments, so there may be some confusing parts—please bear with me as I didn't have time for thorough documentation. If you have any questions or encounter issues, please either leave a comment on this article or contact us directly through our "Inquiries" page. Alternatively, you can also reach me via direct message on X (@ryusei_46).