
どうも、@ryusei__46です。
今回の記事の内容は表題の通りです。「Pythonで文字お越しする方法」を開設した記事はググればそこそこ出てくるのですが、少し踏み込んだことをしようとすると、情報が足りなかった部分が多々あったので、それを含めてシェアしようと考えました。
私が以前制作したデスクトップアプリで「Transmedia」というのがあるのですが、こちらは海外(主に英語)の動画や音声を文字お越しして、更にDeepLで日本語に翻訳し、それを専用のプレイヤーで字幕付きで表示させるといったものです。
メディアの文字お越しと翻訳、専用のプレイヤーを搭載したアプリケーションです。. Contribute to ryusei-48/transmedia development by creating an account on GitHub.
こちらのアプリを製作する際にPythonの文字お越しの処理をがっつり行う必要がありました。この記事で扱うPythonのライブラリでもあるOpen AIがオープンソースで提供している「Whisper」という機械学習モデルを使用しています。
では制作したアプリの宣伝はこの辺にして、ここから記事の本題に入っていきたいと思います。
実行環境の確認
私の実行環境(ハードウェア)は以下の通りです。
- OS:Windows 11 Pro 64bit
- CPU:AMD Ryzen 9 5900X 12 Core Processor
- GPU:NVIDIA GeForce RTX 2060 SUPER 8G
- メモリー:DDR4 32GB 3200MHz
- ストレージ:MVME M.2 SSD 1TB Read/Write 7000MB/s
上記のハードウェア環境でOpen AIの「Whisper」モデルを動かします。
「Whisper」モデルを使うにあたって、今回は「faster-whisper」というPythonライブラリを使用します。
Faster Whisper transcription with CTranslate2. Contribute to SYSTRAN/faster-whisper development by creating an account on GitHub.
今回使用する「faster-whisper」というライブラリですが、こちらは融資によって開発されているもので、Open AIが公式に提供しているライブラリより優れたパフォーマンスを発揮させることができます。
具体的には、処理速度の向上と使用するメモリーサイズの削減です。
処理速度は公式のライブラリと比べておおよそ5倍以上早く、使用するメモリーサイズに関してはおおよそ3倍~4倍削減できています。
特に理由がない限りこちらのライブラリを使用するのが良いと思います。VRAMに余裕がない方も同様に。
Whisperモデルを使用する準備
前提としてPythonを使用するのでまだWindowsにPythonを動かす環境が準備できていない方は以下のサイトを参考にしてみてください。MacやLinuxユーザー向けにもそれぞれ開設があります。
ここでは、Pythonの未経験者の学習用に、Pythonをインストールする方法を、Windows、macOSなど、環境別に解説しています。 当サイトでは、Pythonの質問は受け付けていません。インストールで困ったら、 Python.jp Discordサーバ な
では、最初にfaster-Whisperの依存ライブラリである「pytorch」という機械学習を行うためのライブラリをインストールしていきます。
PyTorchとは
PyTorchは、Pythonのオープンソース機械学習ライブラリで、Deep Learning(深層学習)を行うためのツールです。2016年にFacebookの人工知能研究グループによって初期開発され、現在ではPythonの機械学習ライブラリとして高い人気を誇ります。
この「pytorch」のインストールがやや面倒なポイントですね。
使用するPCにグラフィックカードが搭載されていない場合はCPUで処理を行うことになりますが、こちらの場合はpytorchのインストールは簡単です。以下のpipコマンドでインストールできます。
pip3 install torch torchvision torchaudioしかし、グラフィックカードを使って処理をしたい場合は、「CUDA」を使うための環境構築も必要になります。また、同時に「CUDNN」も導入する必要があります。「CUDNN」は、「CUDA」上で動作する深層学習用アーキテクチャです。
CUDAとは
CUDA(Compute Unified Device Architecture)は、NVIDIAが開発した、グラフィックス処理装置(GPU)を用いた並列コンピューティングのためのプラットフォームです。CUDAは、GPUの性能を最大限に活用して、大量のデータを高速に処理することを可能にします。
CPUだけでも今回のWhisperモデルは使えるのですが、一番精度の高い「large-v2」や最近Open AIがリリースした「large-v3」サイズを使おうとするとべらぼーに時間がかかります。CPUの性能にもよりますが、私のPCでは、音声であれば元の時間の2倍以上要しました。
グラフィックカードで試したところ、「RTX 2060 SUPER」では元の時間の5分の1程度で処理が終わりました。やはり爆速なので、グラフィックカードを搭載しているPCを持っているのであれば、CUDAが使える環境を整えることを強くおすすめします。
CUDAとCUDNNの対応バージョンを確認する
まず、PyTorch公式の「GET STARTED」のページに行き、対応するCUDAのバージョンを確認します。

Set up PyTorch easily with local installation or supported cloud platforms.
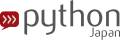
記事出費辻店でcuda 12.1まで対応しているようです。今回はバージョン12.1を使います。

また、こちらのページでは、対応する項目を選択していくことで、それぞれの環境に対応したインストールコマンドが表示されるようになっています。CUDAとCUDNNの導入が終わった段階で、こちらのpipコマンドを実行してPyTorchをインストールすることになります。
次に、CUDAの「Support Matrix - NVIDIA Docs」のページを開き、CUDAのバージョンとOS・NVIDIAドライバーバージョン・使用しているGPUのアーキテクチャが問題ないか確認しておきます。
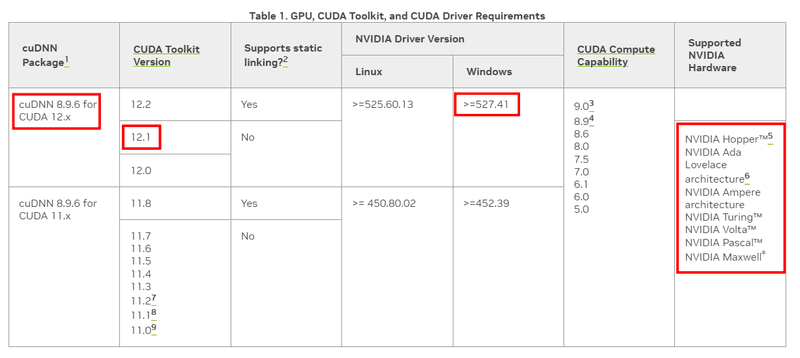
「NVIDIA Driver Version」については、グラフィックカードのドライバーをインストールしていれば、「NVIDIA Control Panel」というツールがインストールされているので、キーボードの「Win + Q」でアプリを検索して起動します。
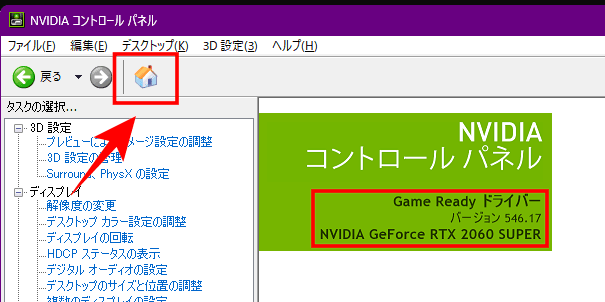
「Supported NVIDIA Hardware」については少し分かりにくいですが、個々のグラフィックカードで採用されたアーキテクチャの名前になります。こちらは「List of Nvidia graphics processing units」で自身が使っているグラフィックカードのアーキテクチャが確認できます。
このページの中には、歴代のグラフィックカードの詳細情報が網羅されているのでかなり膨大な量になっていると思いますが、キーボードの「Ctrl + F」でページ内を検索して、自分の使っているグラフィックカードを見つけます。私の場合は「GeForce RTX 2060 SUPER」なので、「GeForce 20 series」に区分されていて、アーキテクチャの名称は「Turing」だということが分かります。
なので、「Supported NVIDIA Hardware」については、「NVIDIA Turing」になるので問題ないことが分かりますね。
Build Tools for Visual Studioのインストール
CUDAをインストールする前に、「Build Tools for Visual Studio」を先に入れておく必要があります。これがないとCUDA Tool Kitが動作しません。

Visual Studio IDE または VS Code を無料でダウンロードします。 Windows、Mac で Visual Studio Professional または Enterprise エディションをお試しください。
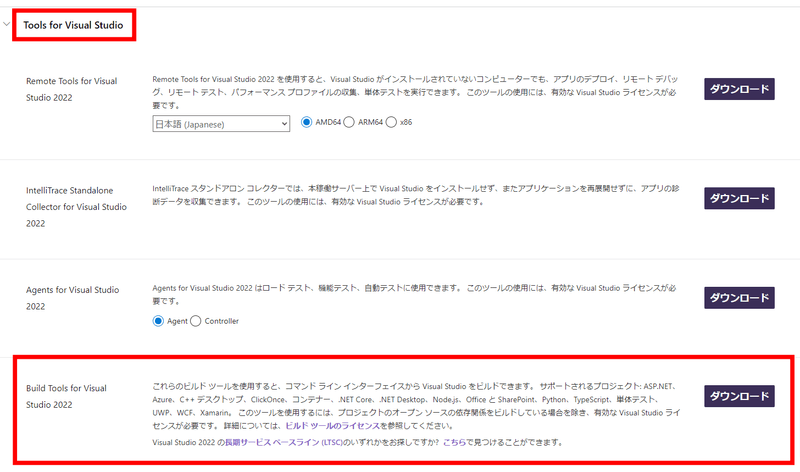
こちらのページで下にスクロールすると「すべてのダウンロード」という項目があるので、その中の「Tools for Visual Studio」を選択し、開いたアコーディオンの中に、「Build Tools for Visual Studio 2022」があるので「ダウンロード」をクリックしてインストーラーをダウンロードします。
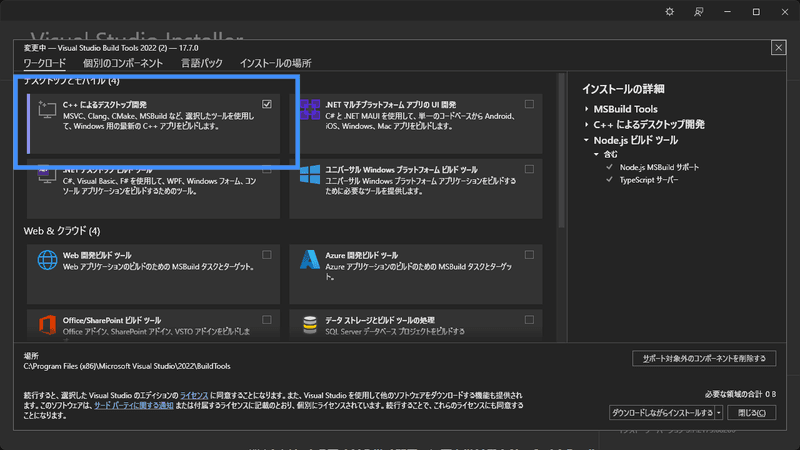
インストーラーを起動すると下のような画面が現れるので、「C++によるデスクトップ開発」にチェックを付けてインストールを完了させておいてください。
CUDAとCUDNNのインストール
それでは、確認が取れたバージョンの「CUDA Tool Kit」と「CUDNN」をWindowsにインストールしていきます。
CUDA Tool Kitは「CUDA Toolkit Archive」のページを開いて、私の場合はバージョン12.1を使うので「CUDA Toolkit 12.1.0 (February 2023)」をクリックします。
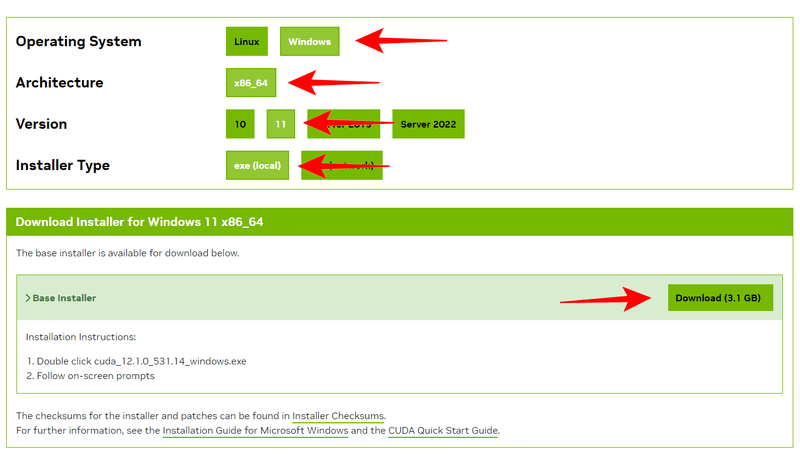
ダウンロード画面では、自分の環境に応じたタイプのインストーラーが選べるようになっています。
インストーラーがダウンロードできたらそのまま実行してインストールを完了させてください。
CUDAがインストールできたか確認するには、コマンドプロンプトかPowershellで下記のコマンドを実行します。
$ nvcc -V
nvcc: NVIDIA (R) Cuda compiler driver
Copyright (c) 2005-2022 NVIDIA Corporation
Built on Tue_May__3_19:00:59_Pacific_Daylight_Time_2022
Cuda compilation tools, release 12.1, V11.7.64
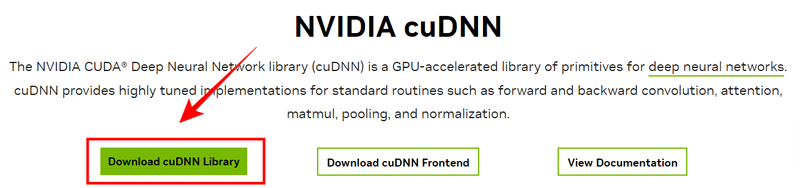
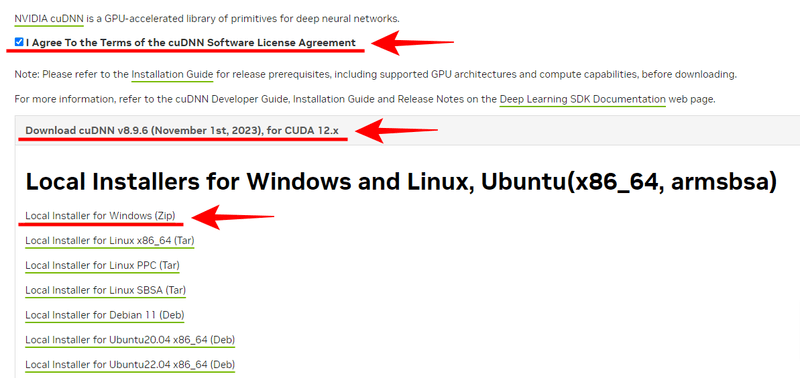
Build cuda_12.1.r11.7/compiler.31294372_0次に、「CUDNN」のインストールを行います。「CUDNN」は「NVIDIA cuDNN」のページを開き、「Download cuDNN Library」ボタンをクリックします。初めてCUDNNをダウンロードする場合は、アカウント登録が必須なのでそちらは各自で行ってください。
次の画面では、「 I Agree To the Terms of the cuDNN Software License Agreement」にチェックを入れると、ダウンロードできるCUDNNのバージョンが表示されます。私の場合は「Download cuDNN v8.9.6 (November 1st, 2023), for CUDA 12.x」を選択し、下に表示されたインストーラーのダウンロードリンクの中から「Local Installer for Windows (Zip)」をクリックし、インストーラーの同梱されたZIP形式の圧縮ファイルをダウンロードするします。
ダウンロードしたZIPファイルの中に「bin」、「include」、「lib」という3つのフォルダーが入っているので、これらをCUDAのインストールフォルダーに上書きします。CUDAのインストールパスは、「C:\Program Files\NVIDIA GPU Computing Toolkit\CUDA\v12.1」になると思います。ここに上書きしてCUDNNのインストールは完了です。
「PyTorch」と「Faster-Whisper」のインストール
ここまででPytorchをCUDAで使用する準備が整ったので、こちらのPyToch公式の「GET STERTED」のページを開き、自分の環境に合うインストールコマンドをコピーします。
私の場合は、「PyTorch Build:Stable (2.1.1)」、「Your OS:Windows」、「Package:Pip」、「Language:Python」、「Compute Platform:CUDA 12.1」となります。
最後に、「Run this Command:」の部分に出力されたインストールコマンドをコピーします。
pip3 install torch torchvision torchaudio --index-url https://download.pytorch.org/whl/cu121これでPyTorchでCUDAが使えるようになったはずです。CUDAが有効になっているか確認するには、PythonのインタラクティブモードあるいはPythonのスクリプトファイルを実行する形で、以下のコードを実行します。
import torch
torch.cuda.is_available() // trueが出力されればOK
次はf「Faster-Whisper」のインストールですが、これは以下のコマンドを実行すれば完了です。
pip3 -U install faster-whisperこれでWhisperモデルを使って文字お越しする準備が整いました。
「Faster-Whisper」で文字お越しを実践する
単純に文字お越ししたテキストを箇条書きするだけなら、下記のコードでできます。
from faster_whisper import WhisperModel

model_size = "large-v2"
model = WhisperModel(model_size, device="cuda", compute_type="int8")

# or run on GPU with INT8
# model = WhisperModel(model_size, device="cuda", compute_type="int8_float16")
# or run on CPU with INT8
# model = WhisperModel(model_size, device="cpu", compute_type="int8")
fileName = "audio.m4a"
segments, info = model.transcribe(
  "audio.m4a", word_timestamps=True,
  initial_prompt="こんにちは、私は山田です。最後まで句読点を付けてください。",
  beam_size=5, language='ja'
)

print("Detected language '%s' with probability %f" % (info.language, info.language_probability))

with open("transcribed.txt", 'w') as f:
  for segment in segments:
    f.write( segment.text + "\n" )
print("[%.2fs -> %.2fs] %s" % (segment.start, segment.end, segment.text))model_sizeには、
- tiny:39M(メガバイト)/処理は速いが、精度は低い
- base:74M
- small:244M/デフォルトモデル
- medium:769M
- large:1550M/処理に時間がかかるが、最も高精度
- large-v1:1550M/largeモデルのアップデート版
- large-v2:1.54B(ギガバイト)/最新のバージョンで、最も高精度を持つモデル(だったが、2023年9月下旬ごろ「large-v3」がリリースされました。)
- large-v3:現行最新モデル
以上のサイズが指定できます。下に行くほど制度は上がりますが、処理負荷と使用メモリー量が増大します。faster-whisperを使用するのであれば、一番精度の高いlarge-v2であってもVRAMは6GBぐらいあればいけると思います。
compute_typeは、int8、float16、float32が選択可能となっています。この値は、Whisperモデルが数値をどのように扱うかを設定するもので、桁が大きいほど制度は高くなりますが負荷が増大します。
word_timestampsは、一つ一つの単語単位の出現開始時刻と出現終了時刻も結果に含めるかどうかを設定するパラメータになります。segment.wordsで単語ごとの情報にアクセスできます。これは、データを細かく成形する時に便利です。
initial_promptは、最初にWhisperモデルに支持する内容をプロンプトで指定するためのパラメータです。今回の例の場合、「こんにちは、私は山田です。最後まで句読点を付けてください。」と設定していますが、句読点をしっかり付けて良いタイミングでセグメントを切るようにヒントを与えています。
languageは、処理させる音声ファイルまたは動画ファイルの言語を指定するパラメータです。特に指定しなくても自動で判定してくれますが、その分オーバーヘッドが発生するので、指定してあげた方が処理時間は短縮されます。
JSONファイルに結果を整形して出力する
私が作成した以下のコードを使うと単語単位の情報を含めた全てのデータが出力できます。
// transcribe.py
import sys, glob, json, re

print("########## Start of character arrival ##########")

try:
    from torch import cuda
    from faster_whisper import WhisperModel
except ImportError:
    sys.stderr.write("「faster_whisper」か「pytorch」モジュールが見つかりません。\n")
    sys.exit(1)

mediaSourcePath = sys.argv[1]
mediaFilePath = glob.glob( f"{ mediaSourcePath }\\*" )[0]
model_size = sys.argv[2]
useLang = sys.argv[3] if sys.argv[3] else None
transcribe_results = []
plasticated_result = []

model = WhisperModel(
    model_size, compute_type="float16",
    device= 'cuda' if cuda.is_available() else 'cpu'
)
segments, info = model.transcribe(
    mediaFilePath, beam_size=5, word_timestamps=True,
    initial_prompt="こんにちは、私は山田です。Hello, I am Yamada.",
    language=useLang
)

print("Detected language '%s' with probability %f" % (info.language, info.language_probability))

for segment in segments:
    transcribe_tmp = { "start": segment.start, "end": segment.end, "subtitle": segment.text, "word_timestamps": [] }
    for word in segment.words:
        transcribe_tmp["word_timestamps"].append({ "start": word[0], "end": word[1], "text": word[2] })
    transcribe_results.append( transcribe_tmp )
    print("[%.2fs -> %.2fs] %s" % (segment.start, segment.end, segment.text))

with open( f"{ mediaSourcePath }\\transcribe.json", "w", encoding="utf-8" ) as json_file:
    json.dump( transcribe_results, json_file, indent=2, ensure_ascii=False )

if len( glob.glob( f"{ mediaSourcePath }\\transcribe.json" ) ) > 0:
    word_tmp, word_start_tmp, skip_flag = "", 0, False
    for transcribe in transcribe_results:
        for word in transcribe["word_timestamps"]:
            word_tmp += word["text"]
            if not skip_flag:
                word_start_tmp = word["start"]
                skip_flag = True
            if re.search( r"(\.|\?|。)$", word["text"] ):
                plasticated_result.append({
                    "start": word_start_tmp,
                    "end": word["end"], "text": re.sub( r"^\s+", "", word_tmp )
                })
                skip_flag = False
                word_tmp = ""

with open( f"{ mediaSourcePath }\\plasticated.json", "w", encoding="utf-8" ) as json_file:
    json.dump( plasticated_result, json_file, indent=2, ensure_ascii=False )
with open( f"{ mediaSourcePath }\\plasticated.plain.txt", mode="w", encoding="utf-8" ) as txt_file:
    for index, plasticated in enumerate( plasticated_result ):
        txt_file.write( str( index ) + ': ' + plasticated['text'] + "\n" )
Commandラインで実行する際に引数を渡します。
$ py transcribe.py [media_source_path] [model_size] [language]media_source_pathには、用意した動画や音声ファイルを任意のフォルダーに入れて、そこまでのパスを設定します。model_sizeには、baseやsmallなど使用したいモデルサイズの名称を記述します。languageには、処理するメディアの言語コードを指定します。何も指定しない場合は自動になります。
// transcribe.json
{
	{
    "start": 8.540000000000003, // 出現開始時刻(秒)
    "end": 10.88,  // 出現終了時刻
    "subtitle": " Introducing Apple Vision Pro.",  // 文字お越しされたテキスト
    "word_timestamps": [  // 更に細分化された単語ごとの情報
      {
        "start": 8.540000000000003,
        "end": 9.280000000000001,
        "text": " Introducing"
      },
      {
        "start": 9.280000000000001,
        "end": 10.02,
        "text": " Apple"
      },
      {
        "start": 10.02,
        "end": 10.42,
        "text": " Vision"
      },
      {
        "start": 10.42,
        "end": 10.88,
        "text": " Pro."
      }
    ]
  },
  {
    "start": 12.16,
    "end": 16.0,
    "subtitle": " The era of spatial computing is here.",
    "word_timestamps": [
      {
        "start": 11.870000000000001,
        "end": 12.24,
        "text": " The"
      },
      {
        "start": 12.24,
        "end": 12.62,
        "text": " era"
      },
      {
        "start": 12.62,
        "end": 12.96,
        "text": " of"
      },
      {
        "start": 12.96,
        "end": 13.28,
        "text": " spatial"
      },
      {
        "start": 13.28,
        "end": 13.8,
        "text": " computing"
      },
      {
        "start": 13.8,
        "end": 15.58,
        "text": " is"
      },
      {
        "start": 15.58,
        "end": 16.0,
        "text": " here."
      }
    ]
  },

  // ・・・・・・・以下省略
}
「plasticated.json」では、「transcribe.json」ファイルを元に単語単位のデータを整形して、日本語なら「。」、英語なら「.(ピリオド)」までを単一セグメントとしてデータをまとめたものです。
// plasticated.json
{
  {
    "start": 8.540000000000003,
    "end": 10.88,
    "text": "Introducing Apple Vision Pro."
  },
  {
    "start": 11.870000000000001,
    "end": 16.0,
    "text": "The era of spatial computing is here."
  },
  {
    "start": 22.57,
    "end": 27.38,
    "text": "When you put on Apple Vision Pro, you see your world and everything in it."
  },

  // ・・・・・・・以下省略
}
上記のデータを使っていろいろな用途で柔軟に対応できると思います。
SRTファイル(字幕)の作成
SRTファイル(SubRip Subtitle File)とは、動画と共に字幕を表示するためのファイルになります。多くのメディアプレイヤーで対応していて、動画に字幕を付けたい場合に使用します。
また、動画編集などで字幕を付けたい場合など、今までは手作業で文字お越ししてテキストを挿入していたと思いますが、PythonとWhisperを使用して文字お越しとSRTファイルの作成を自動化することで大幅な負担軽減と仕事効率化になったりもします。
SRTファイルをメディアプレーヤーで動画再生中に使用するだけなら、SRTファイルを動画ファイルと同じ名前にして同じディレクトリーに置いておけば勝手に読み込んでくれます。詳細はMicrosoftのページ「ビデオ再生中に字幕を表示するために SRT ファイルを使用する方法」でも解説があります。
以下のコードでSRTファイルを作成できます。
// srt-whisper.py
from faster_whisper import WhisperModel
import math, sys

def convert_seconds_to_hms(seconds):
    hours, remainder = divmod(seconds, 3600)
    minutes, seconds = divmod(remainder, 60)
    milliseconds = math.floor((seconds % 1) * 1000)
    output = f"{int(hours):02}:{int(minutes):02}:{int(seconds):02},{milliseconds:03}"
    return output

media_path = sys.argv[1]
language = sys.argv[2]
model_path = sys.argv[3]

model = WhisperModel(model_path, device="cuda", compute_type="int8")

segments, info = model.transcribe(
  media_path,
  initial_prompt="こんにちは、私は山田です。最後まで句読点を付けてください。",
  beam_size=5, language="ja"
)

print("Detected language '%s' with probability %f" % (info.language, info.language_probability))
count = 0
with open(media_path, 'w') as f:  # Open file for writing
  for segment in segments:
    count +=1
    duration = f"{convert_seconds_to_hms(segment.start)} --> {convert_seconds_to_hms(segment.end)}\n"
    text = f"{segment.text.lstrip()}\n\n"

    f.write(f"{count}\n{duration}{text}")  # Write formatted string to the file
    print(f"{duration}{text}",end='')
コマンドラインで以下の引数を渡します。
$ py srt-whisper.py [media_path] [language] [model_size]これを実行するとカレントディレクトリーにメディアファイルと同一の名前のSRTファイルが出力されます。
これで記事の内容は以上です。
また、最近「Transcriber」という完全プライベートで使用できる話者分離対応の文字お越しwebアプリをリリースしたので、良ければ使ってみてください。
音声ファイルをブラウザだけで高精度に文字起こし。音声データはデバイスの外に出ないため完全にプライベート。Whisper AI による話者分離にも対応。
参考にしたサイト

Hi, really great implementation, congratulations. The only thing I missed was saving to a format such as srt or vtt, I decided to add such a function for myself. I'm not a programmer, that's why I ...